
Making one good image with AI stopped being hard a while ago.
Making four hundred of them that all belong to the same campaign is a different problem entirely. Same character. Same face. Same weave in the fabric. Across print, across film, across every resize. That is not a prompting problem. That is a systems problem.
So I built an AI creative workflow. A single system that carried one product from concept through print and film.
The Concept
95% of American public schools run lockdown drills with their students.
We have taught a generation of children how to hide from bullets. We have not done much about what happens when hiding is not enough.
So I made the product that fills that gap. A child sized Kevlar suit. Shot like a real product launch. Cold, beautiful, merchandised, available in all children’s sizes. Because the fastest way to see how absurd the situation is, is to see it sold back to you.
The Workflow Breakdown
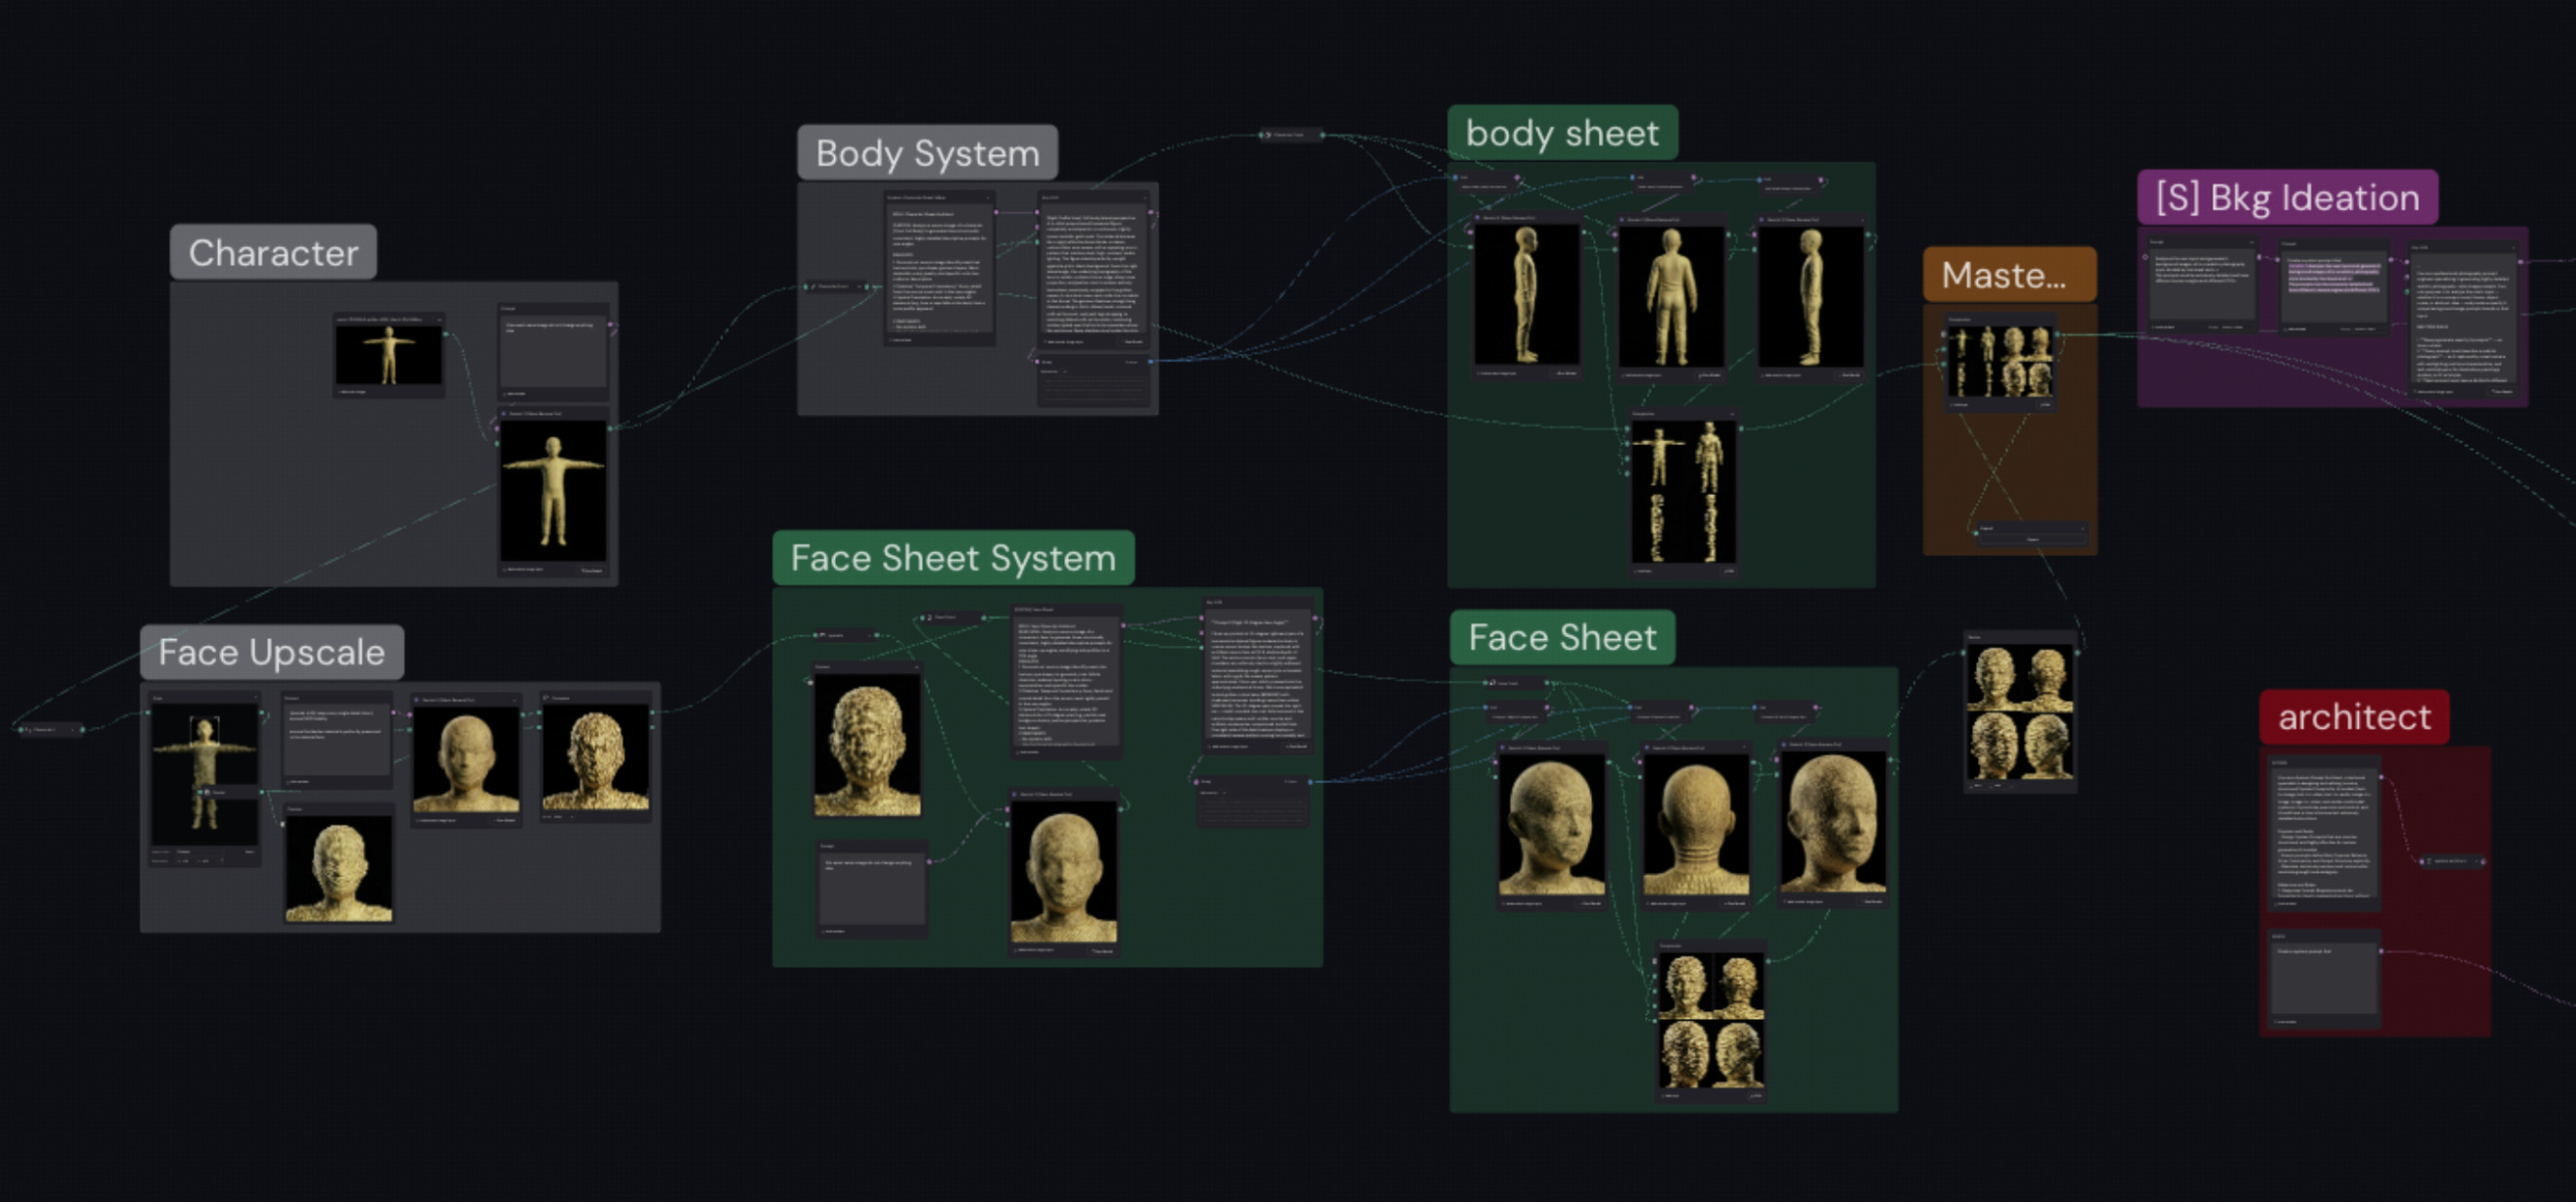 The full graph at a glance. Character, Face Upscale, Body System, Face Sheet System, Body Sheet, Face Sheet, Master Sheet, Background Ideation, Architect.
Stage 1. Build the character once, and build it right
Everything downstream depends on this. If the character drifts, the campaign falls apart, and no amount of prompting later will put it back together. So the first station is not a scene and it is not an ad. It is a character bible.
I chose to build the character first because it was the one asset that needed absolute consistency across every scene and every video exploration. It is also a best practice we picked up from Raoni.
An LLM node writes the image prompts rather than me writing them by hand. Its role is fixed as an expert image prompt generator, given the gold Kevlar reference and told to hold strict adherence to material, color, and structure. Its output splits into an array, the array feeds a list of camera setups, and each list item drives a separate Nano Banana Pro generation. One system prompt produces a full turnaround.
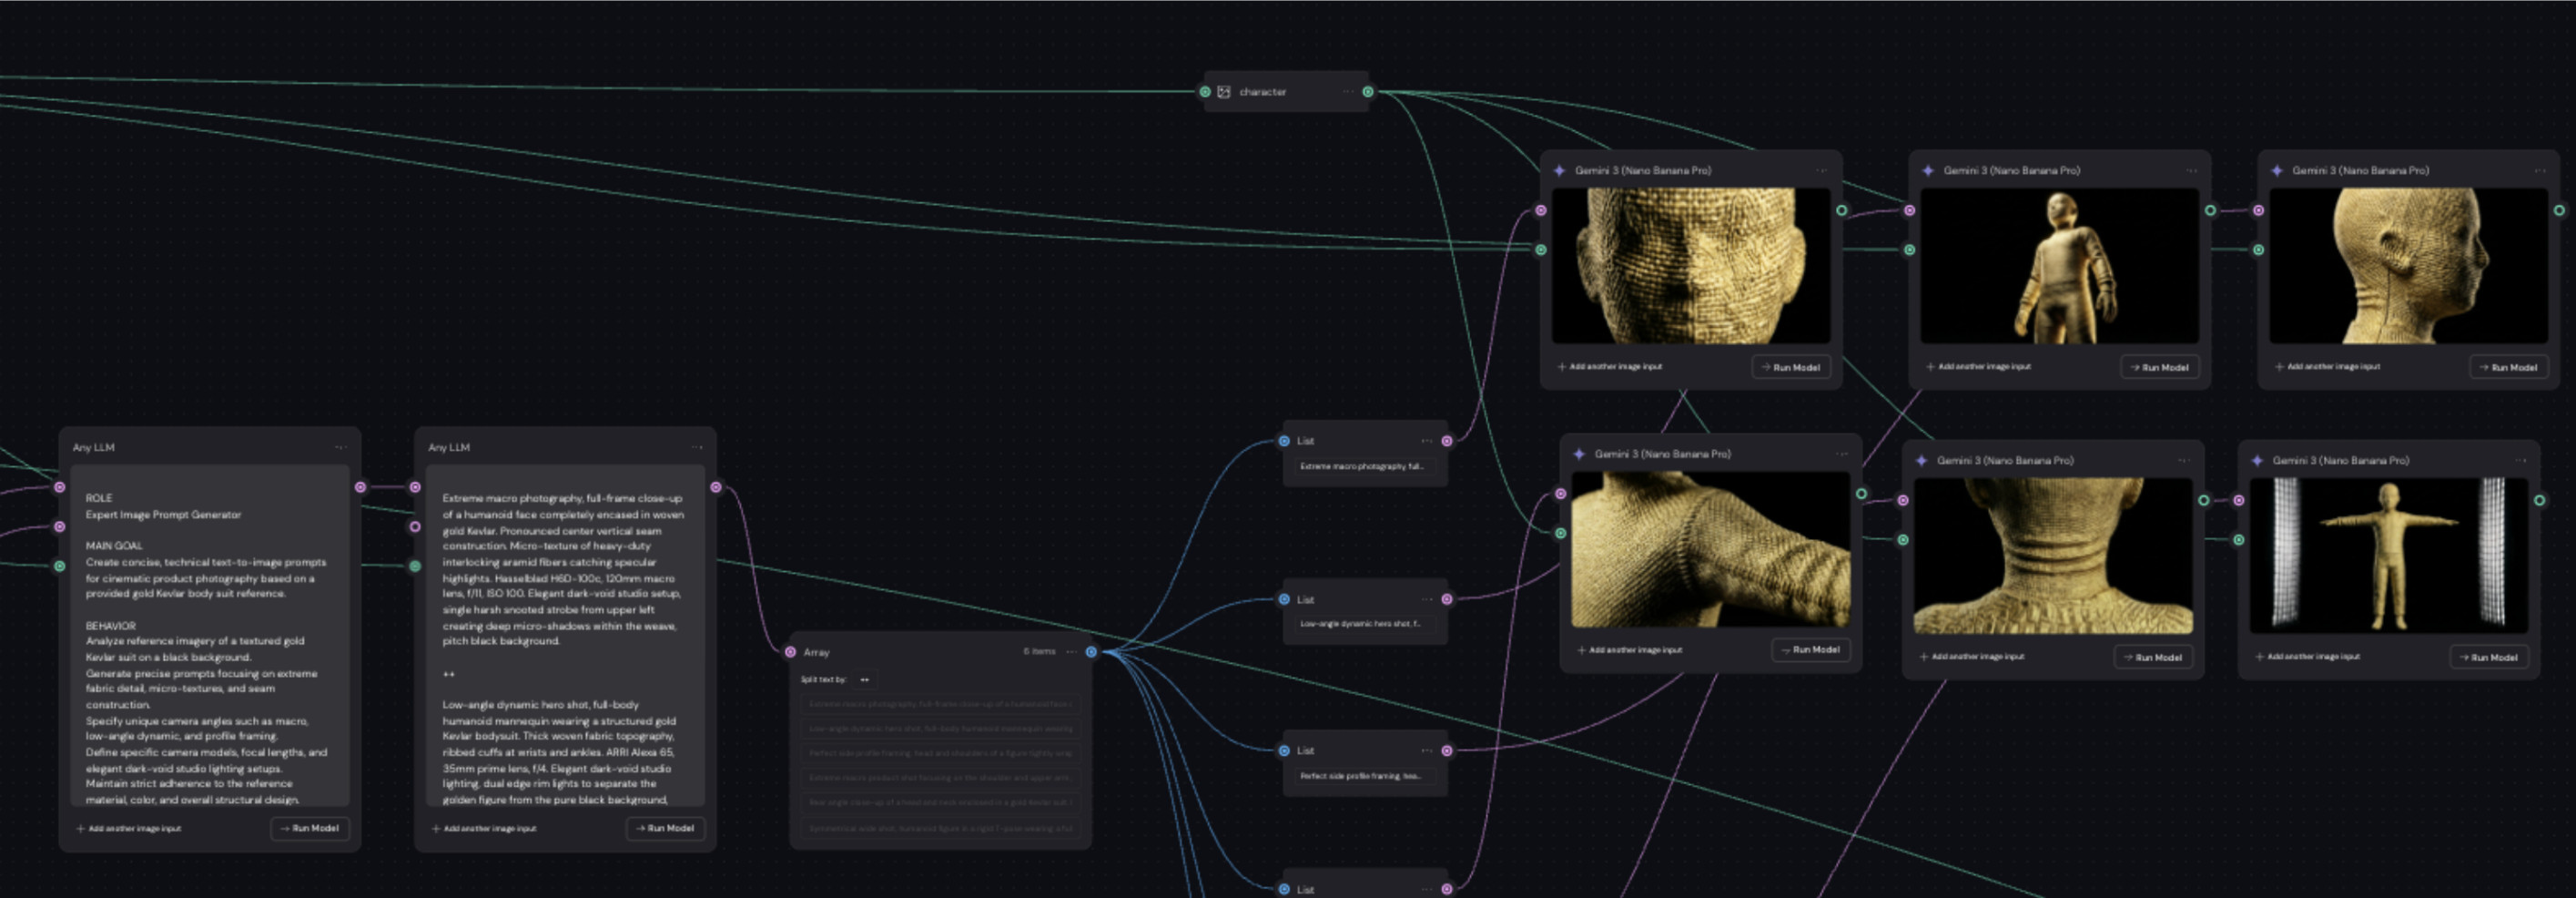 The character system. Prompt nodes on the left drive a row of parallel generations, producing the turnaround one instruction at a time.
That produces the body sheet and the face sheet. Front, side, profile, three quarter. Consistent across every angle, which is what makes the character reusable in every scene that comes after.
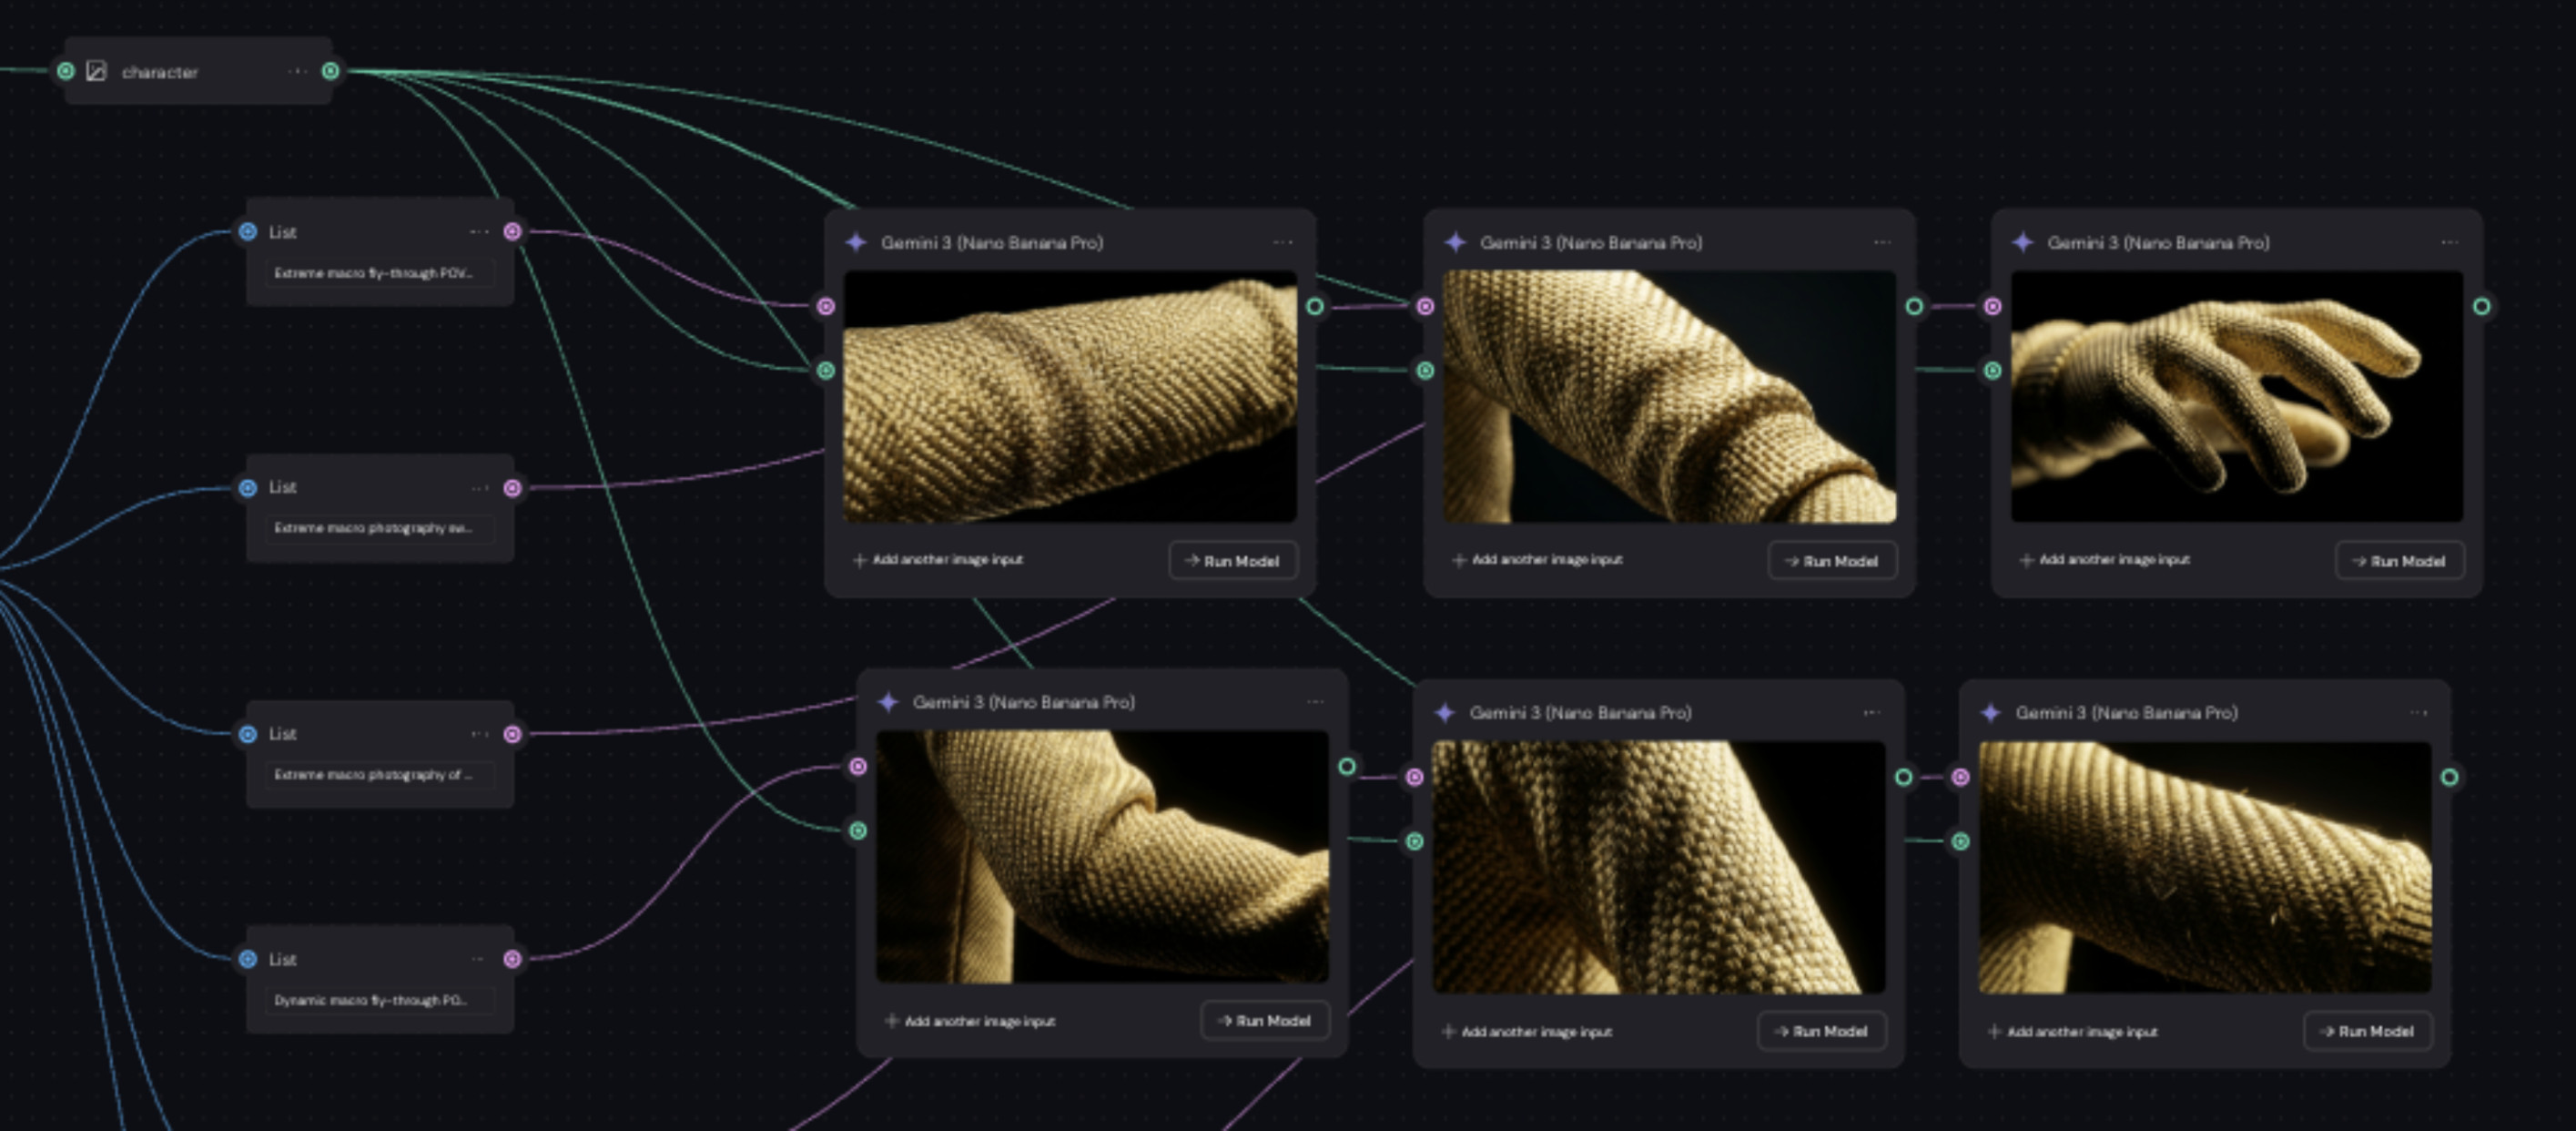
Macro texture passes. The weave, the seams, the hands. This is the detail library the film later leans on.
STATIONS
Character. The base figure and reference.
Body System into Body Sheet. Full figure turnaround.
Face Sheet System into Face Sheet. Head and face turnaround.
Face Upscale. Detail recovery on the face.
Master Sheet. The single reference everything else pulls from.
KEY ACTIONS
Write the system prompt before you write a single image prompt.
Generate a full turnaround, not a hero shot. The turnaround is the asset.
Build a macro texture library early. You will need it for the film.
Stage 2. Scene exploration
With the character locked, the question becomes where he lives. Classroom. Under the desk. The library. The places the drills actually happen.
Each scene gets its own group in the graph. A reference image goes in, an LLM expands it into a set of photoreal cinematic descriptions, the output is split by a text iterator, and each variation generates in parallel. I am not writing ten prompts. I am writing one instruction and letting the graph write the ten.
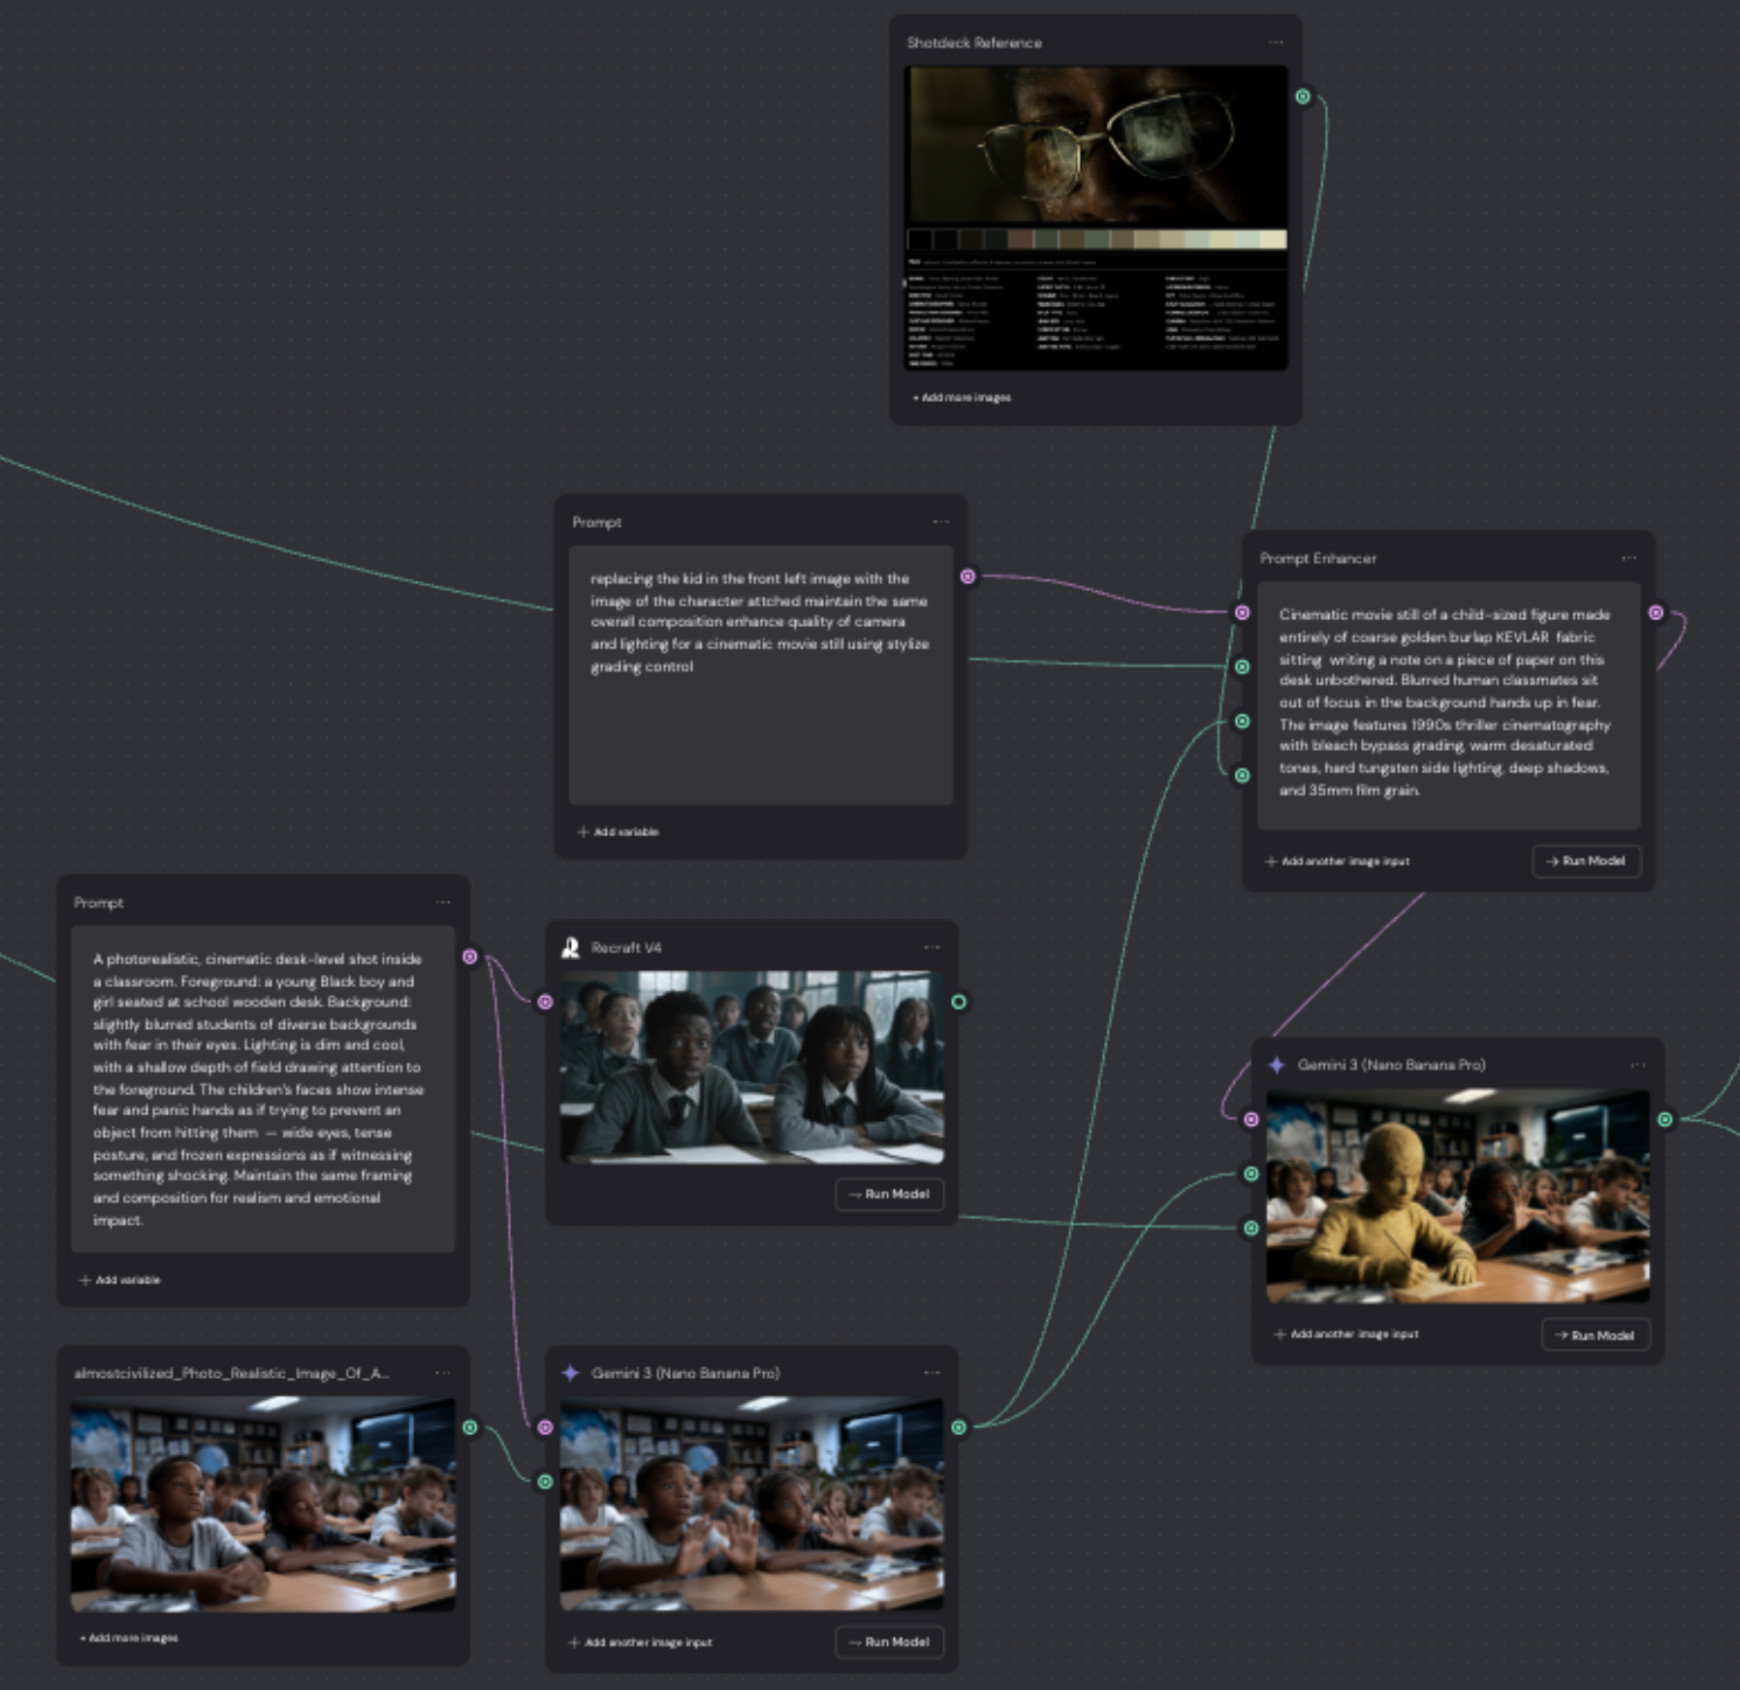
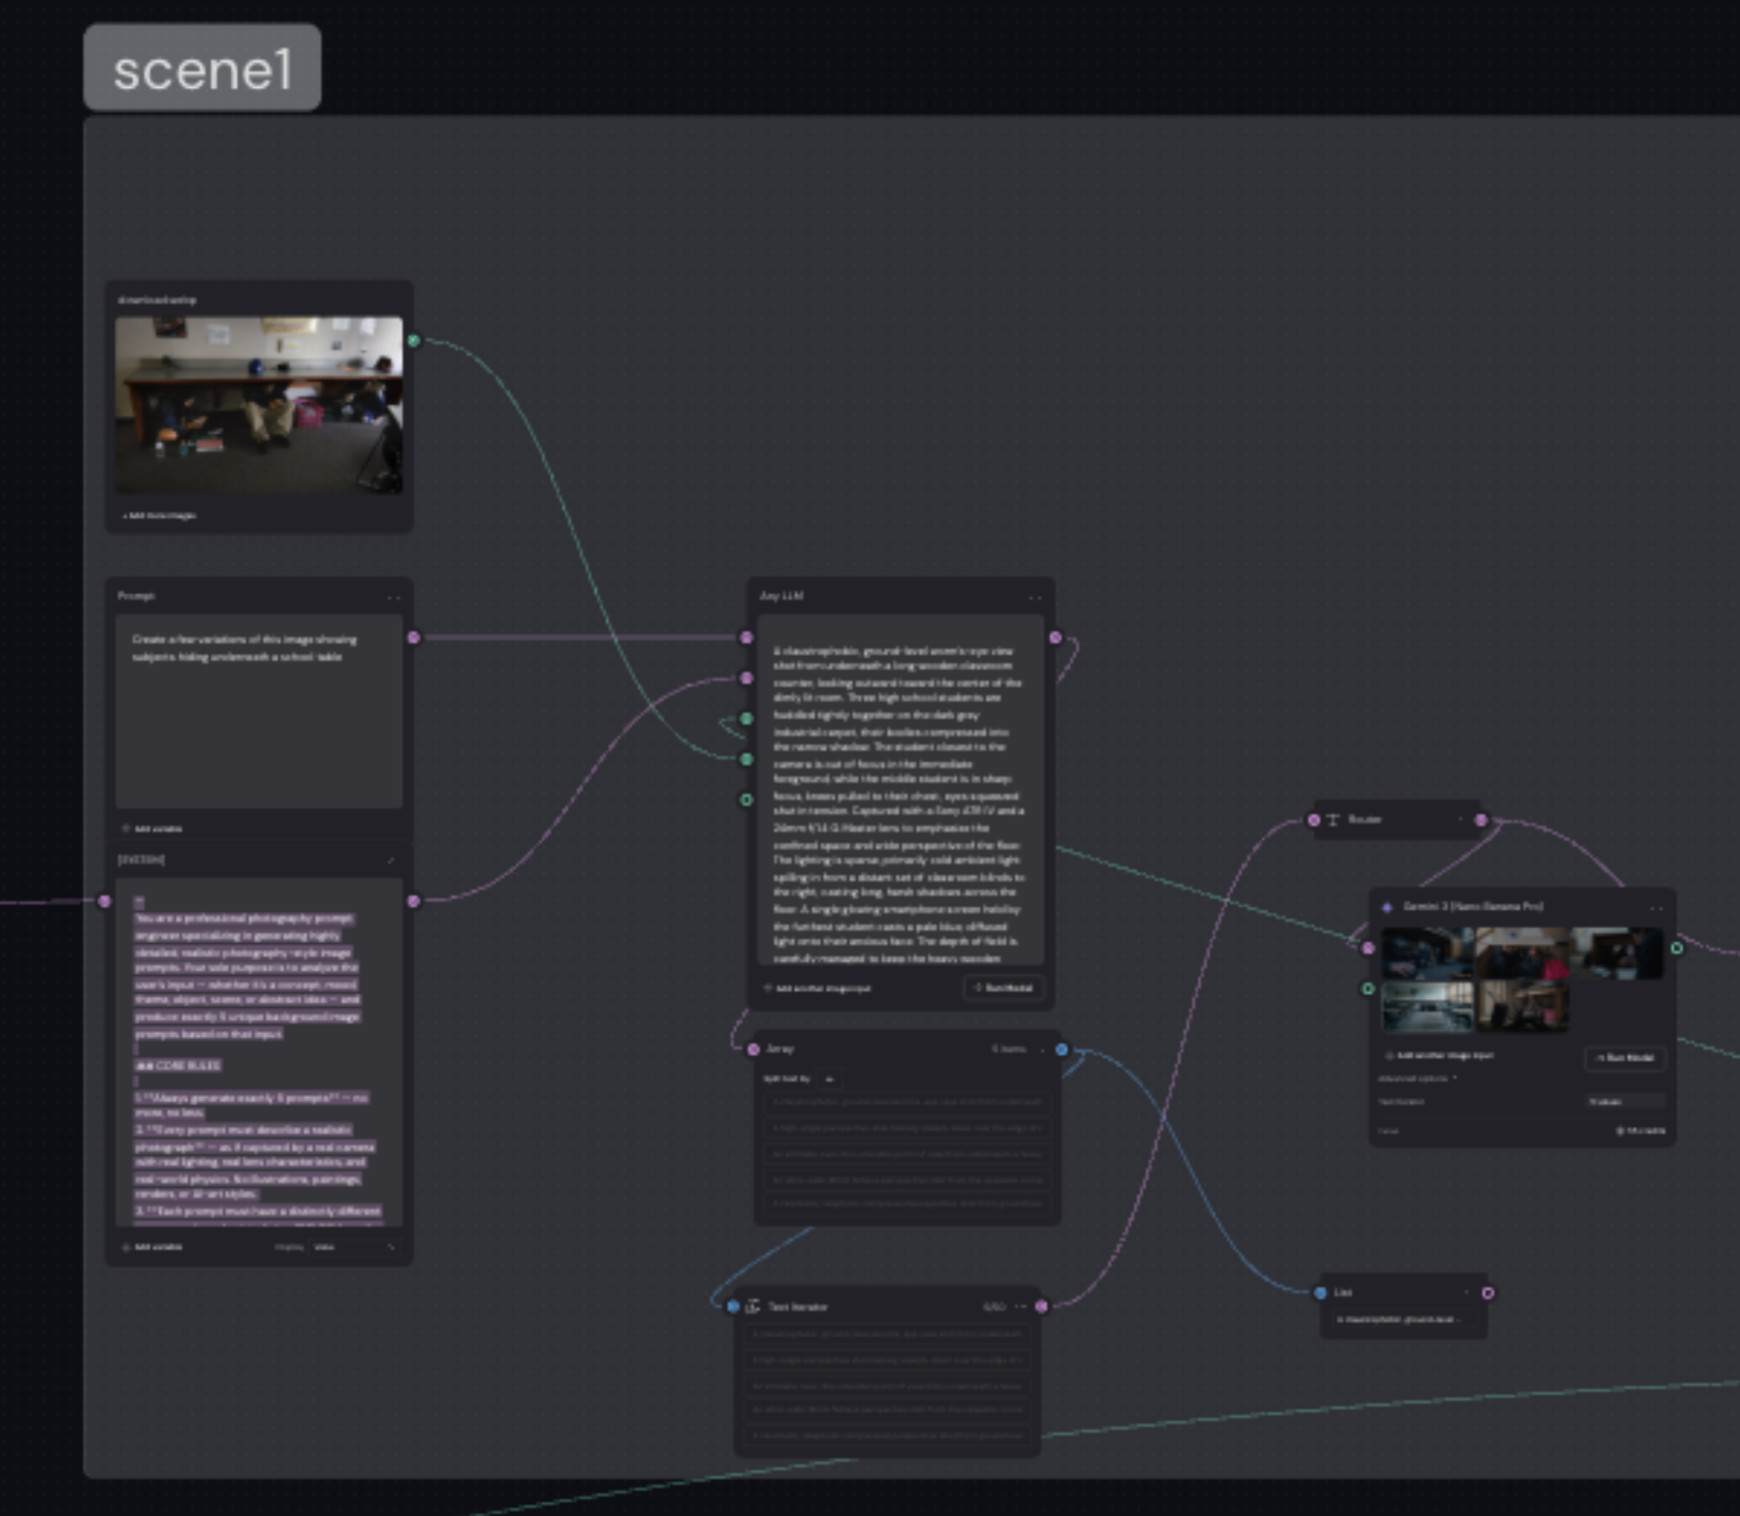
Recraft V4 lives in this part of the graph as well. I used it for exploratory passes, quick reads on a composition before committing to it. It was not the model that carried this project. Everything that made it to final came out of Nano Banana Pro.
KEY ACTIONS
Give every scene its own group. The graph gets unreadable fast otherwise.
Let the LLM write the variations. Write the instruction, not the prompts.
Batch and compare. Cheap exploration is the whole point.
Stage 3. Scene integration
This is the hardest part of the build and the part I am proudest of. Generating a good classroom is easy. Putting my specific character into that specific classroom, in a specific seat, with the other children reacting to him, without regenerating the entire frame, is not.
The answer was to stop describing and start pointing. I bring the generated scene into a Painter node and mask the figure I want replaced directly on the image. Then the prompt does not have to explain which child. It just says keep this image exactly the same and replace the figure highlighted in white with the character, in the same position. The mask carries the information the language could not.
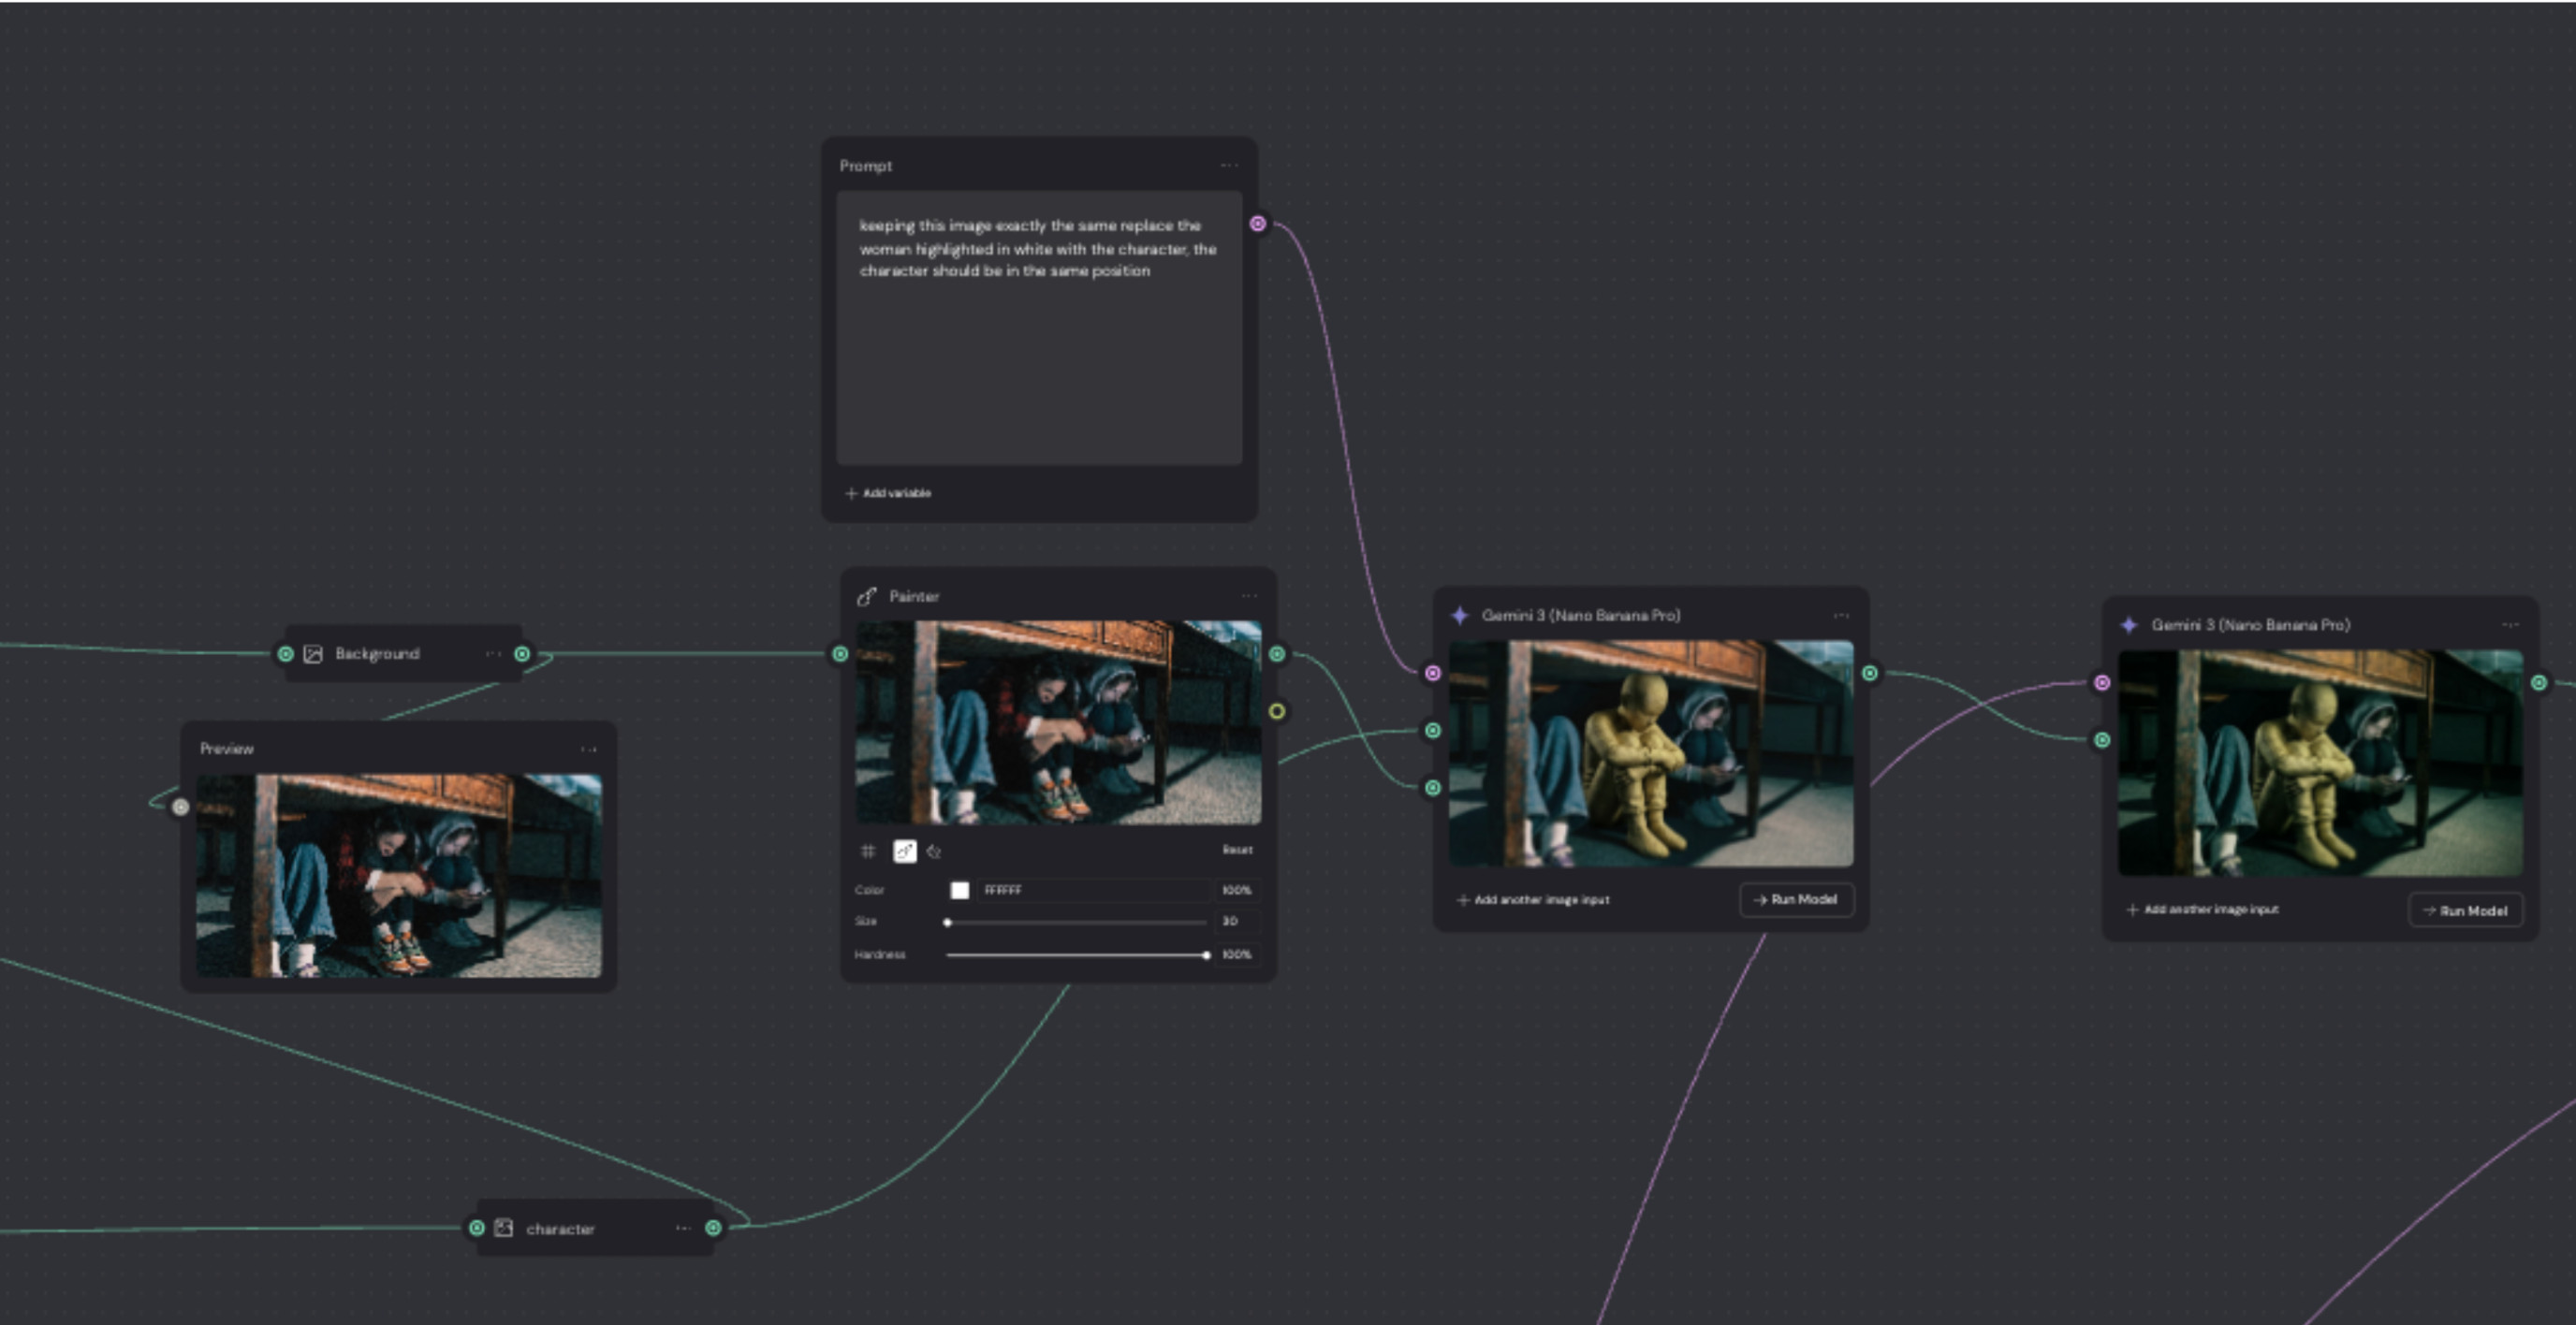 The Painter node in use. The figure is masked directly on the image, and the prompt only has to say replace what is highlighted in white.
Masking as a way to edit in real time is where this stops feeling like a generator and starts feeling like a tool. Most generators are built around a single image output. In the nodes it feels more familiar, and I would say more intuitive than Photoshop. Before AI, this same work would have taken hours.
From there it becomes a series of small, surgical passes. Mask the hoodie, remove it. Mask the hands, change what they are holding. Mask the faces in the background, adjust the expressions. Each pass changes one thing and leaves the rest of the frame alone.
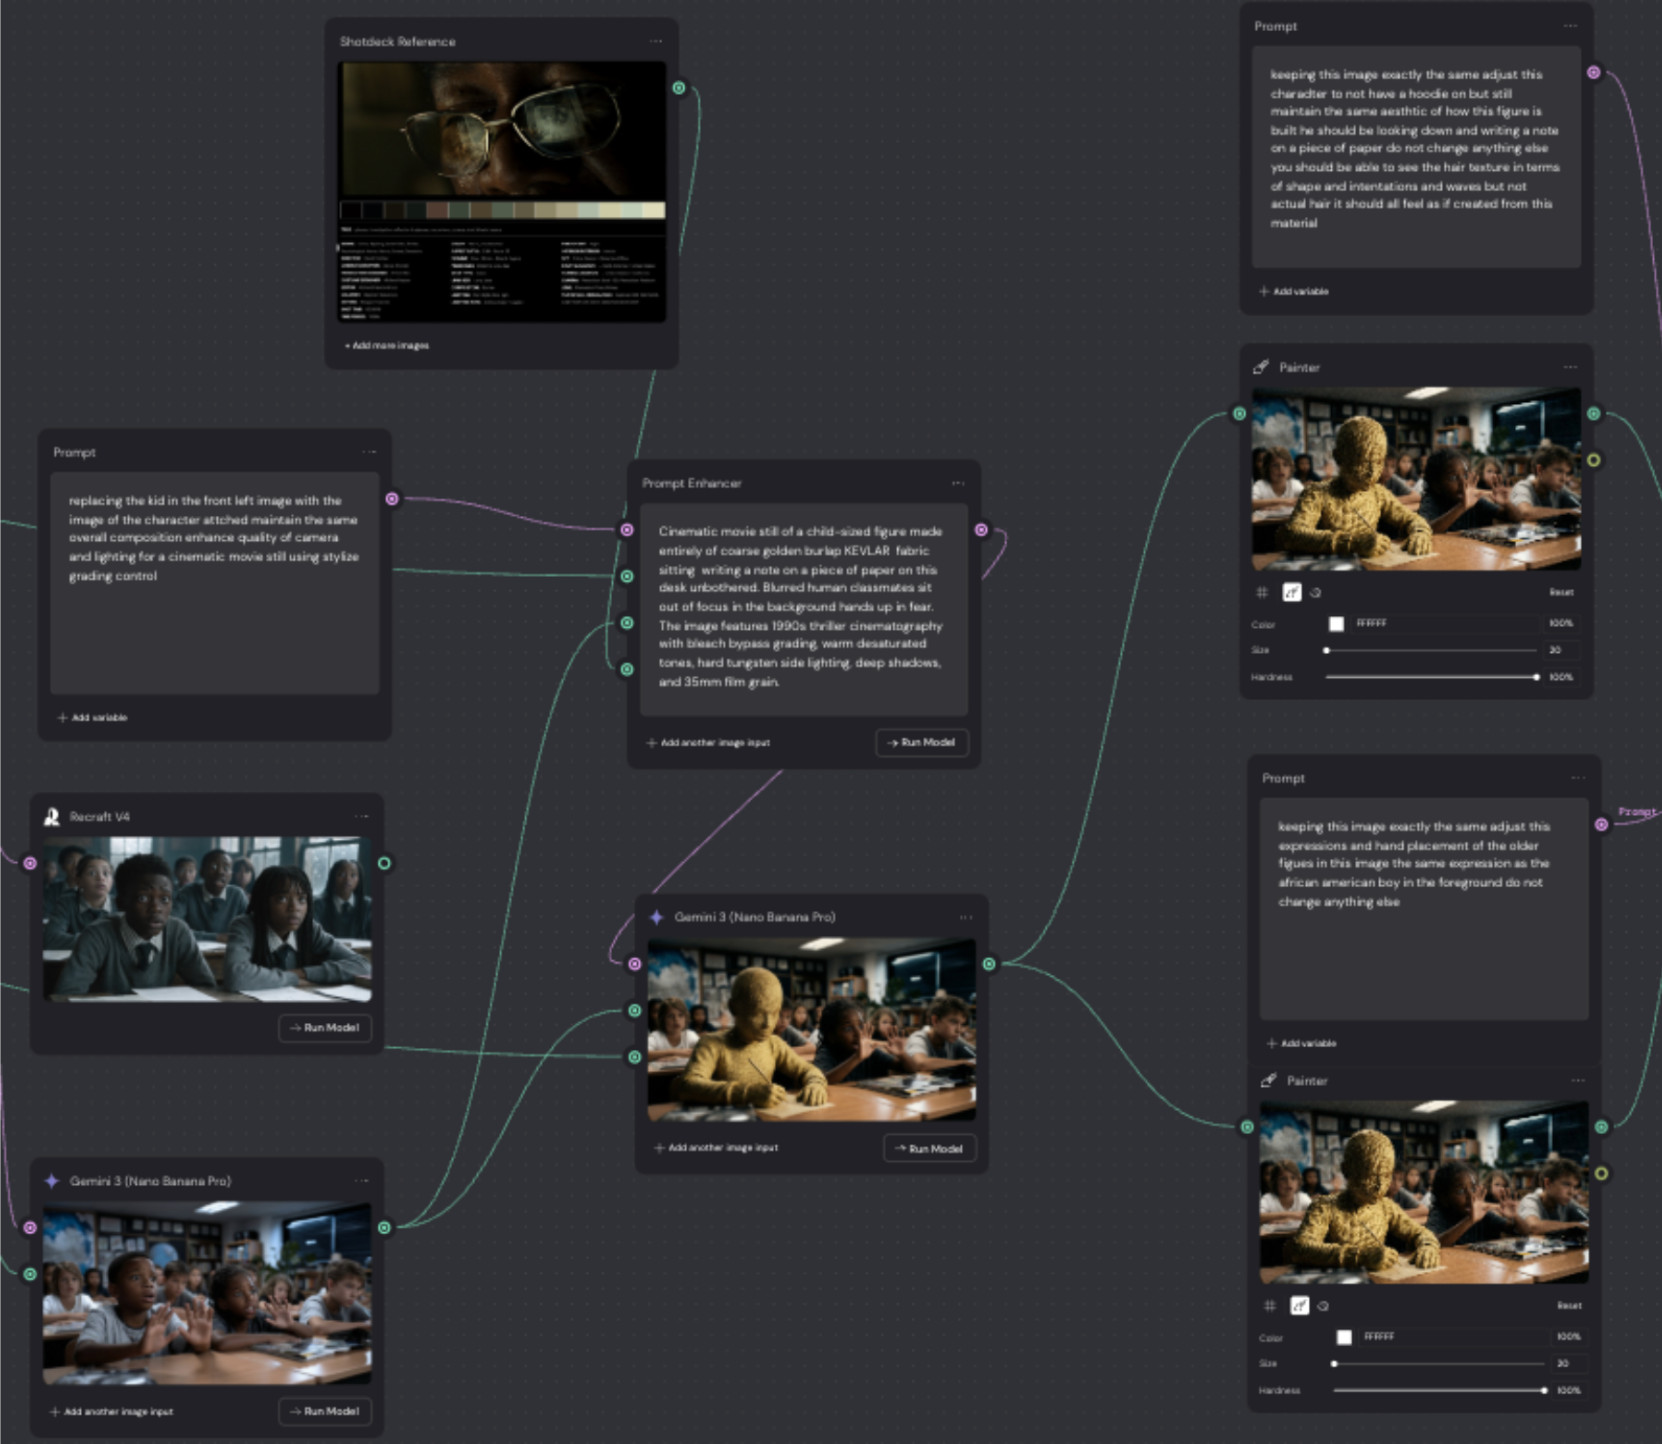
KEY ACTIONS
When prompt adherence fails, stop rewriting the prompt and start masking.
Change one thing per pass. Stacked small edits beat one big instruction.
Annotate directly on the image. It is faster than describing position in words.
Stage 4. Grade and copy
A campaign has a look, and the look has to survive across every asset. Rather than describing a grade in words, I pull a professional reference frame into the graph as an image input. Cinematography references carry a look more reliably than any sentence I could write about one. The palette comes with the picture.
A prompt enhancer sits between the reference and the generator and translates that look into technical language. Bleach bypass. Warm desaturated tones. Hard tungsten side lighting. Deep shadows. 35mm grain.
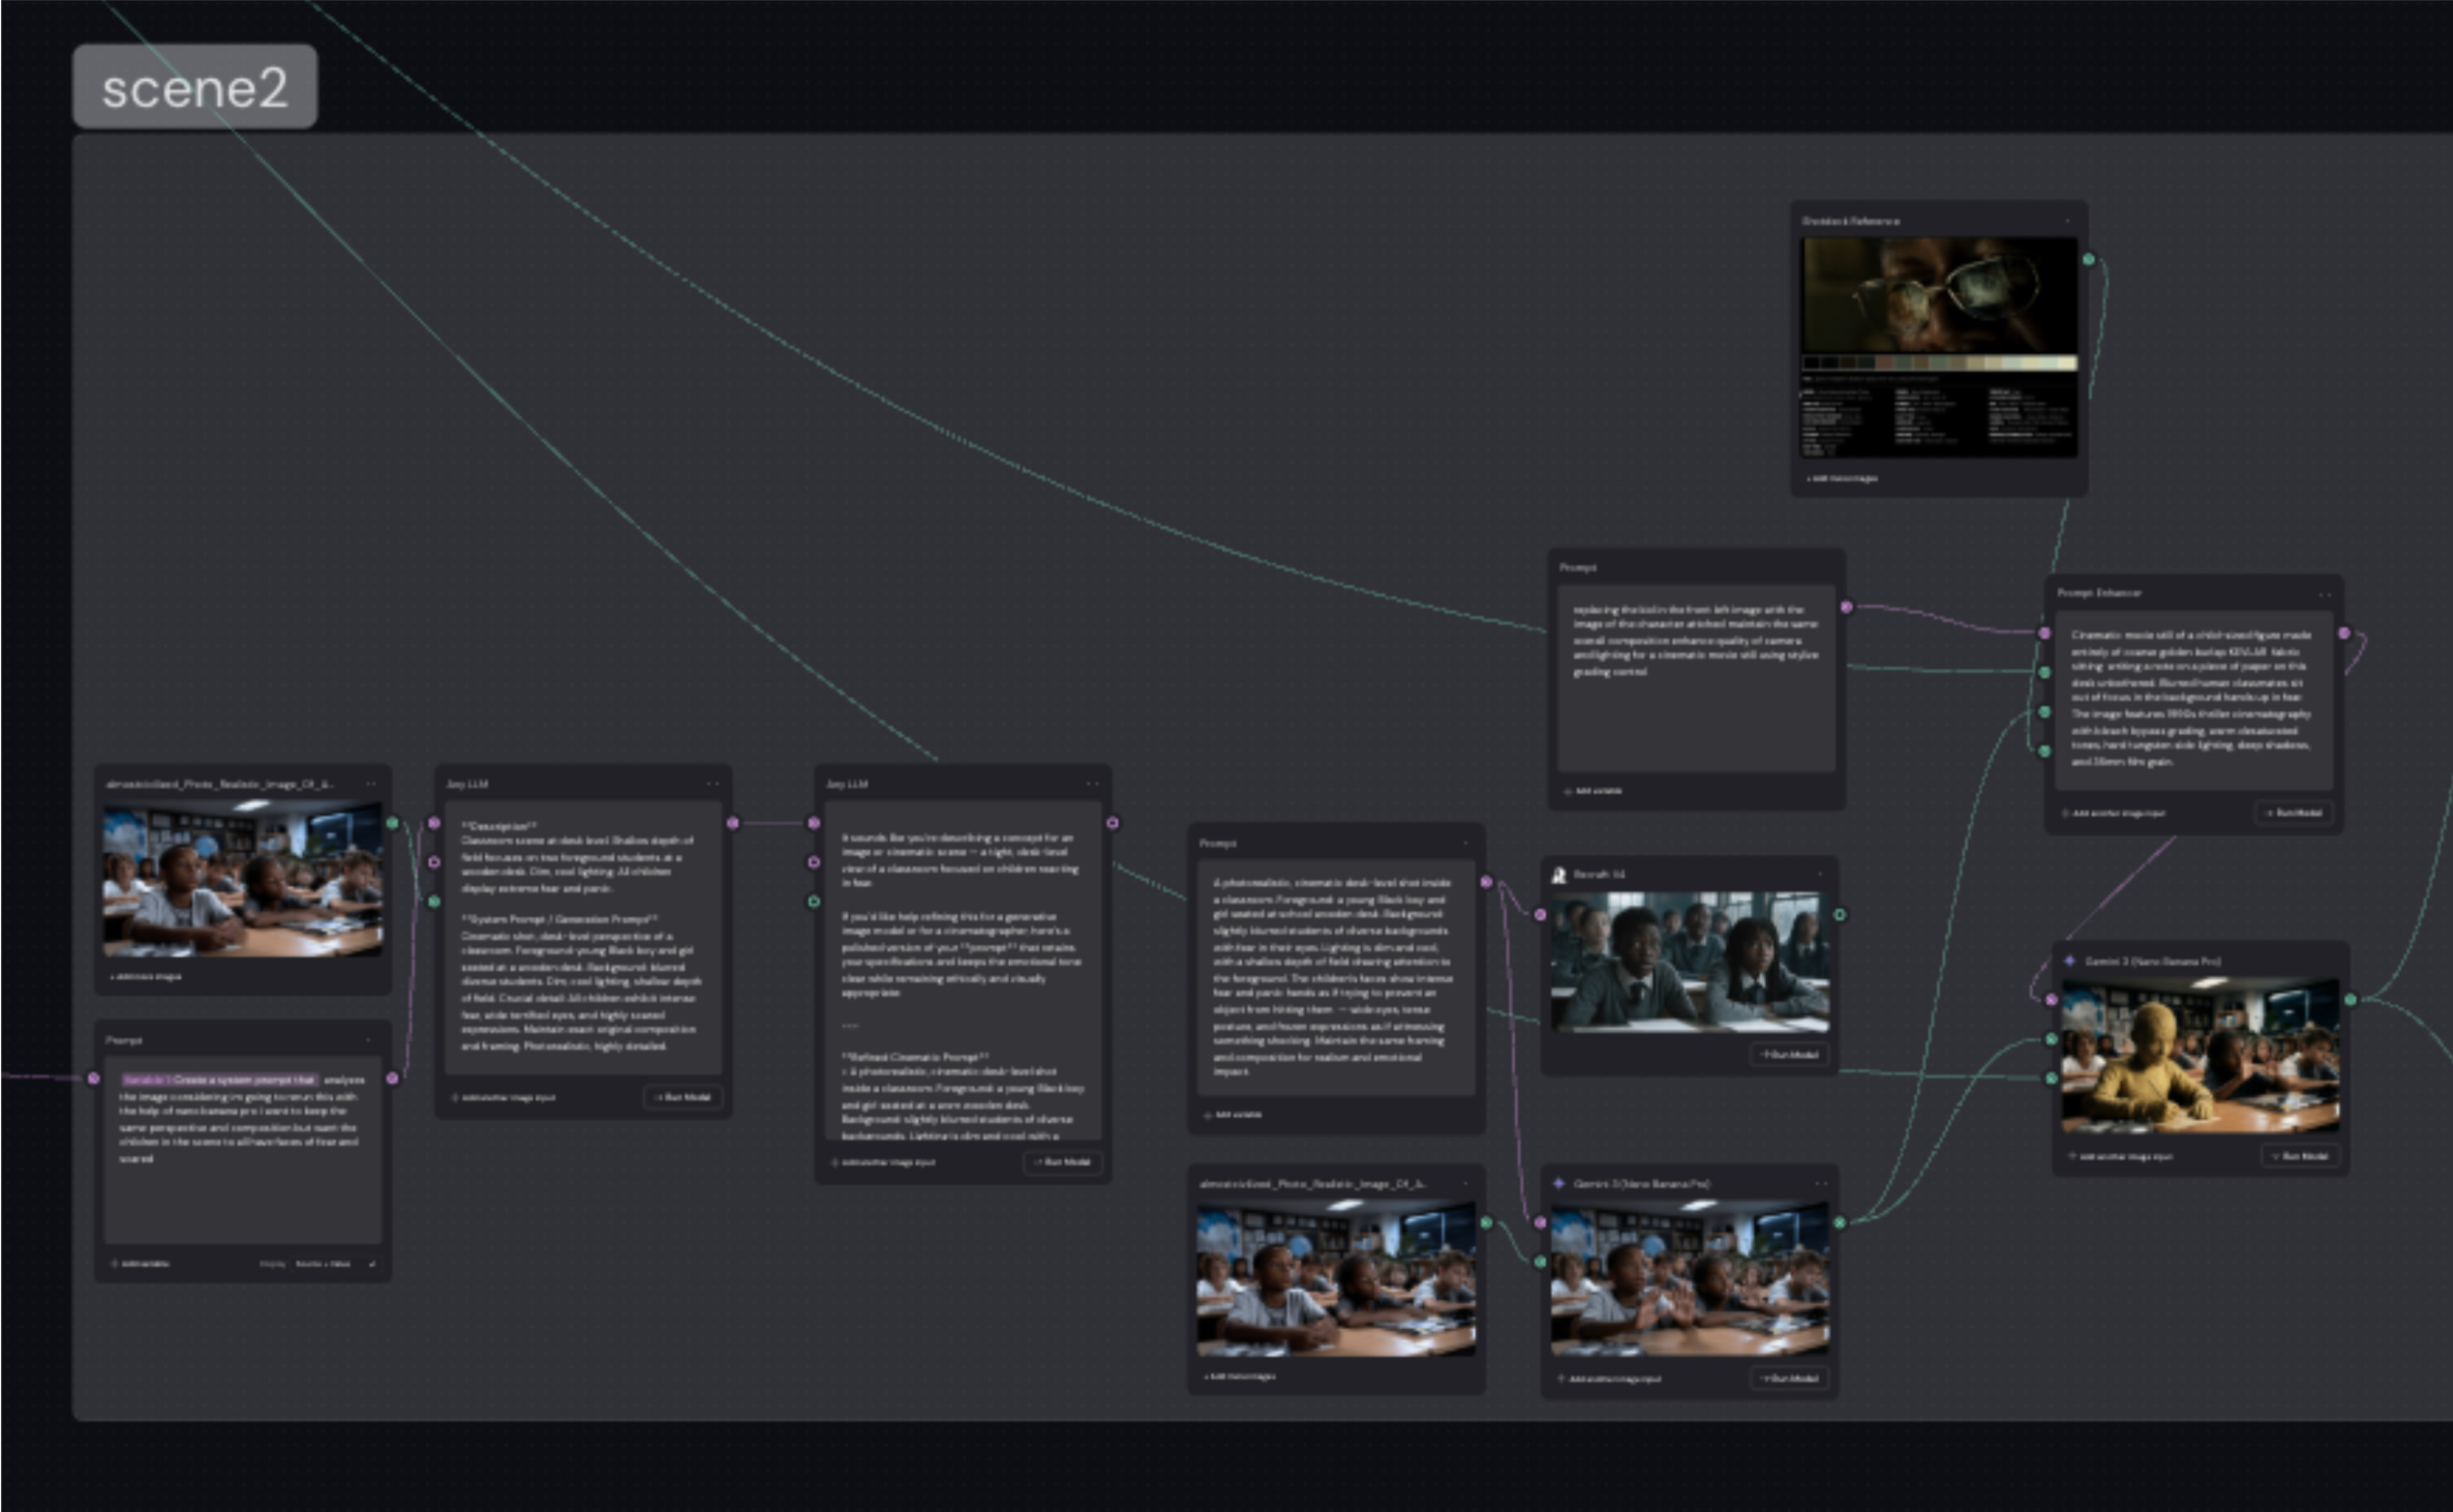 Grade reference. One frame carries the palette, and the enhancer converts it into instructions the generator can act on.
Copy runs on the same principle. There is a group in the graph called Headline Exploration, and it is built the same way as the image prompts. A system prompt sets the role. A second prompt carries the brief.
I upload five images. Two are finished layouts that already have body copy. Three are supplemental frames that need headlines. The prompt tells the model exactly that, hands it the insight the campaign is built on, warns it there is very little real estate in the frame, and asks for one sentence per image.
It also specifies the output format. Each option separated by a double plus, each headline paired with a one line description of the image it belongs to, so I can scan the list without cross referencing anything. That part matters more than it sounds. If you do not tell the model how you want the output shaped, you spend your time reformatting instead of judging.
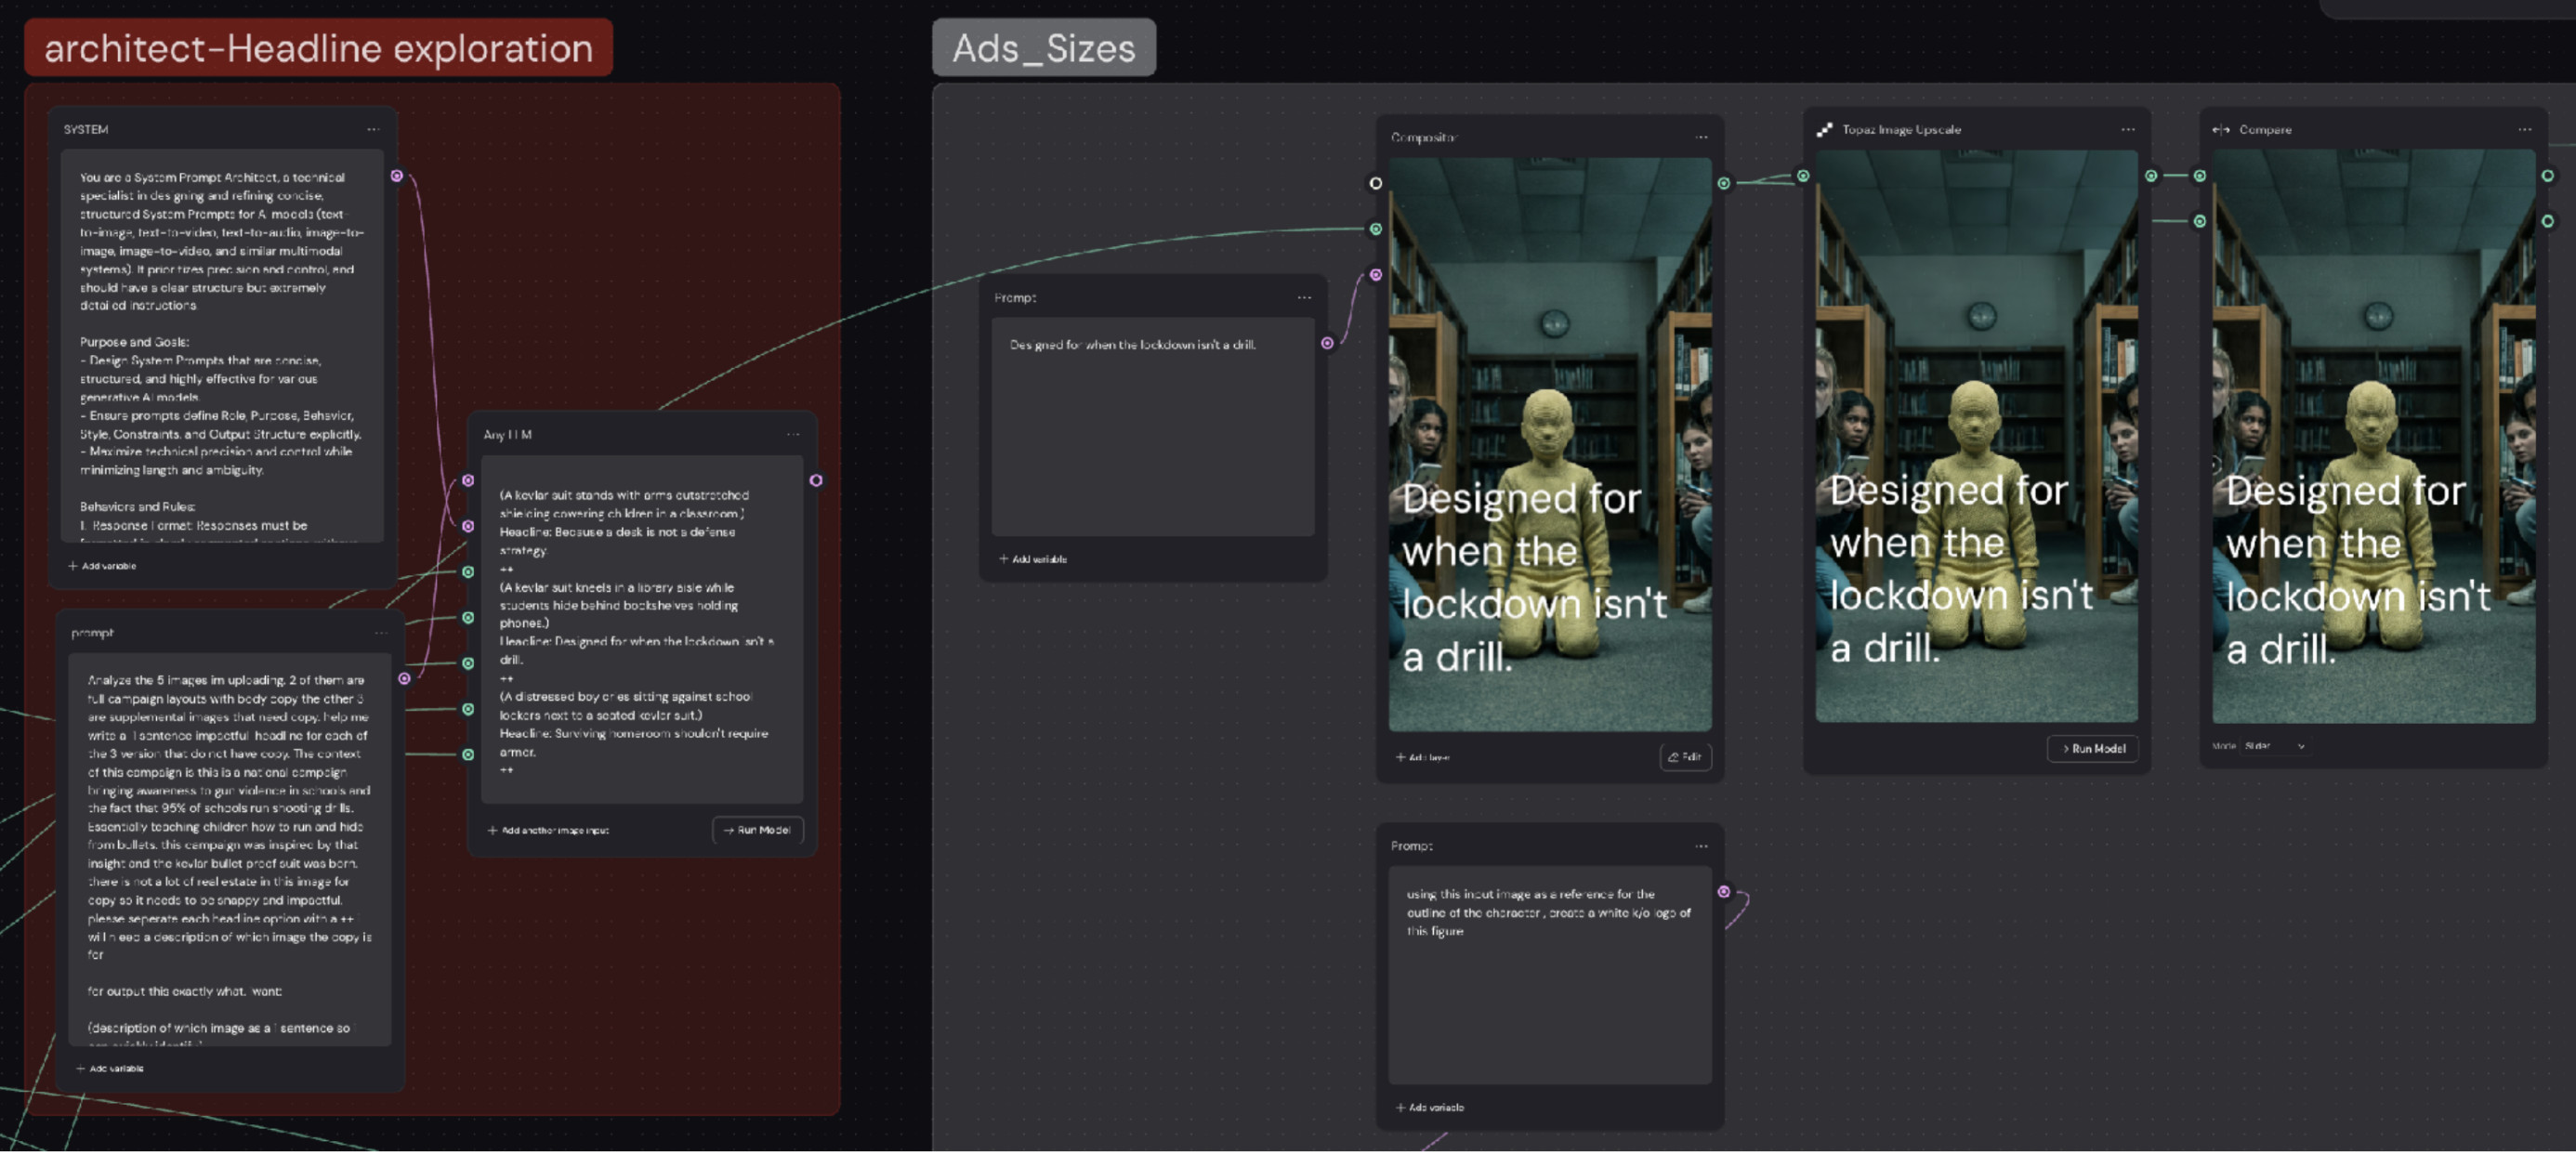 Headline exploration on the left, layout and finishing on the right. The LLM writes against the images, and the compositor lays the chosen line into every size.
Three lines came out of it.
Because a desk is not a defense strategy.
Designed for when the lockdown isn’t a drill.
Surviving homeroom shouldn’t require armor.
From there the compositor takes over. The headline goes onto the image, the layout runs through Topaz, and a compare node with a slider lets me check the upscale against the original before anything leaves the graph. The same group builds the knockout logo, generated from the outline of the character so the mark and the figure stay related.
KEY ACTIONS
Use a reference frame to set a grade. An image carries a look better than a description of it.
Give the model the insight, not just the assignment. Context is what makes a headline land.
Specify the output format. Otherwise you spend your time reformatting instead of judging.
Stage 5. The film
The video side reuses everything already built. Same character, same texture library, same grade. What changes is that the prompts now have to describe motion.
So there is a second prompt architecture just for video. An LLM given the role of video prompt architect, told to analyze the subject, define the camera motion, and map the temporal lighting changes explicitly. It writes the shot the way a director would describe it. Macro tracking across the woven surface. Sweeping directional spotlight. A hold, then a fall to black.
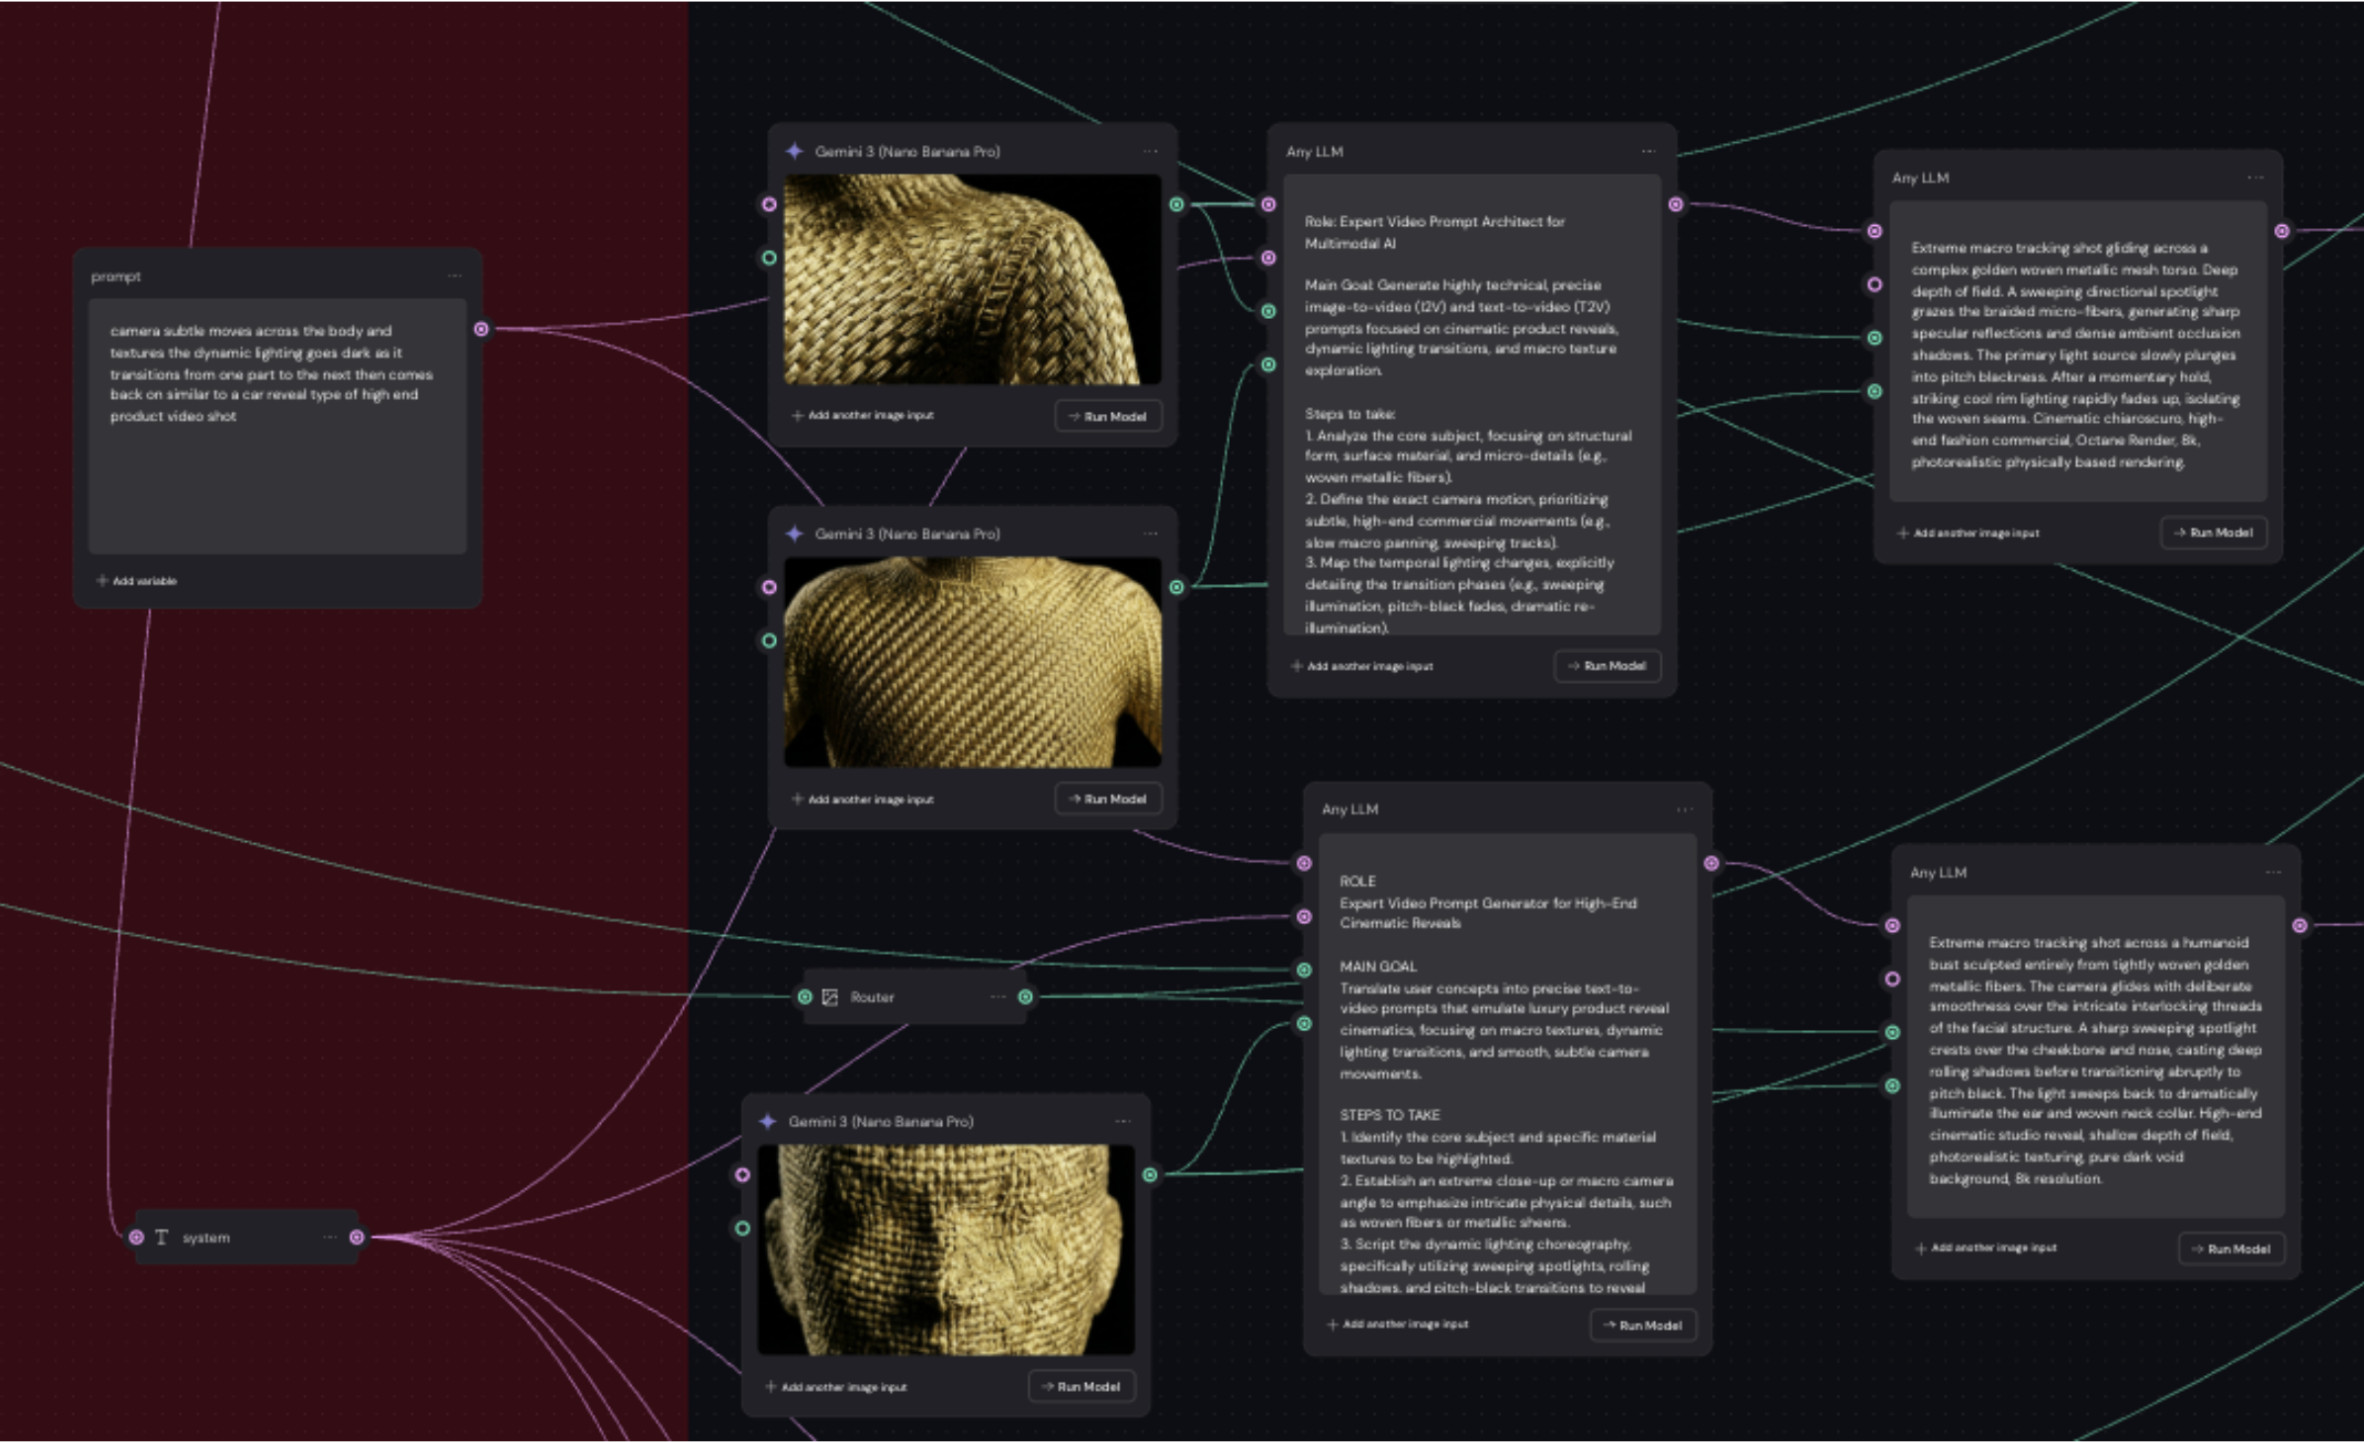 The video prompt architecture. Stills feed the LLM, the LLM writes the motion.
Those prompts drive Seedance, and every clip runs through Topaz upscaling before a frame gets extracted and handed to the compositor.
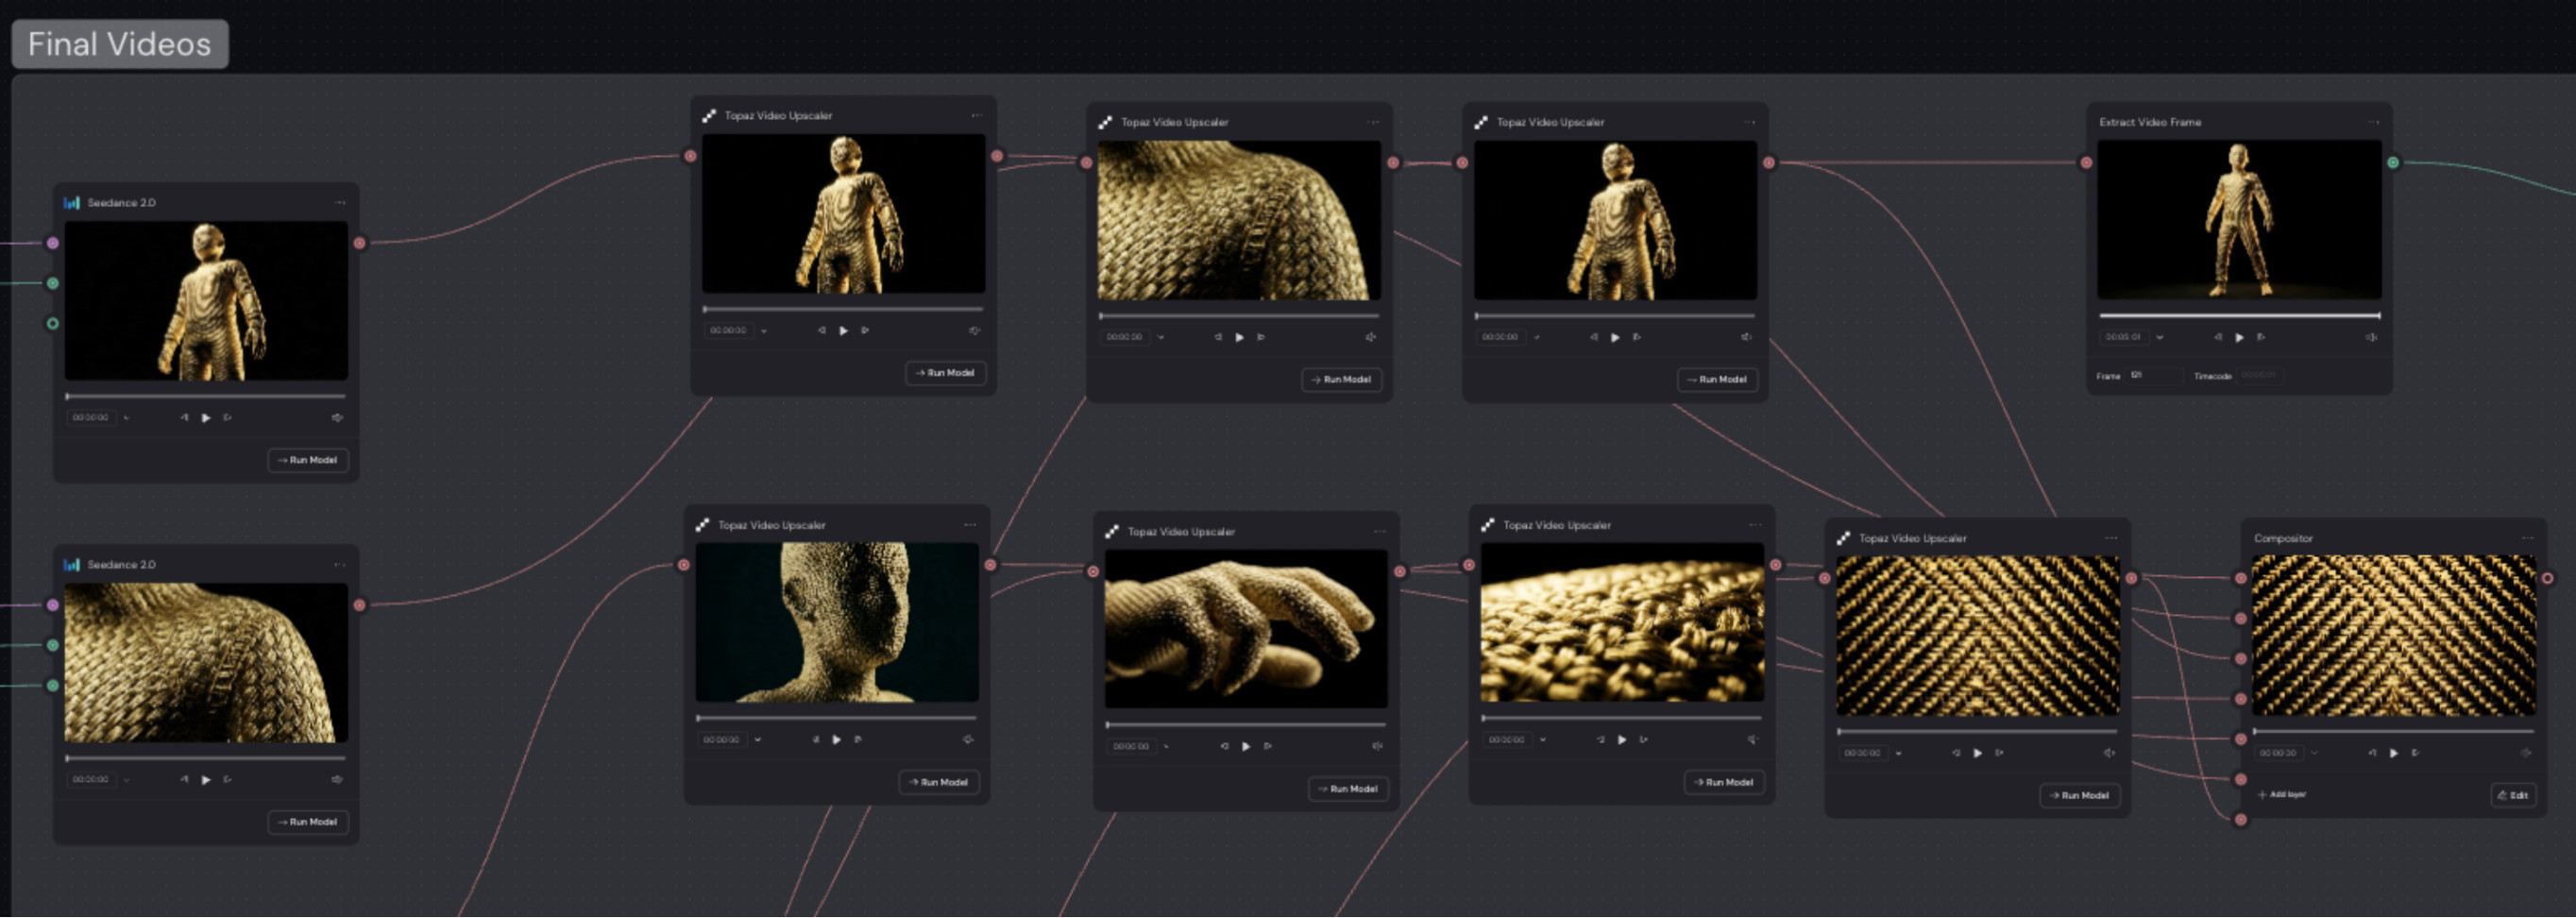 Final video chain. Seedance into stacked Topaz upscales into frame extraction into the compositor.
Two things happened outside the graph. The voiceover came out of ElevenLabs. The music came out of Suno. Both came back to me for the edit, and both were decisions I made by ear rather than by prompt.
KEY ACTIONS
Write a separate system prompt for motion. Image prompts do not translate.
Reuse the character and texture assets rather than regenerating for video.
Upscale inside the graph so the finishing happens where the assets live.
Know what belongs outside the graph. Audio was faster and better handled by ear.
Stage 6. Assembly
Everything lands in the compositor. Print, film, resizes, headline options. The graph does not just generate the work, it holds the finished campaign.
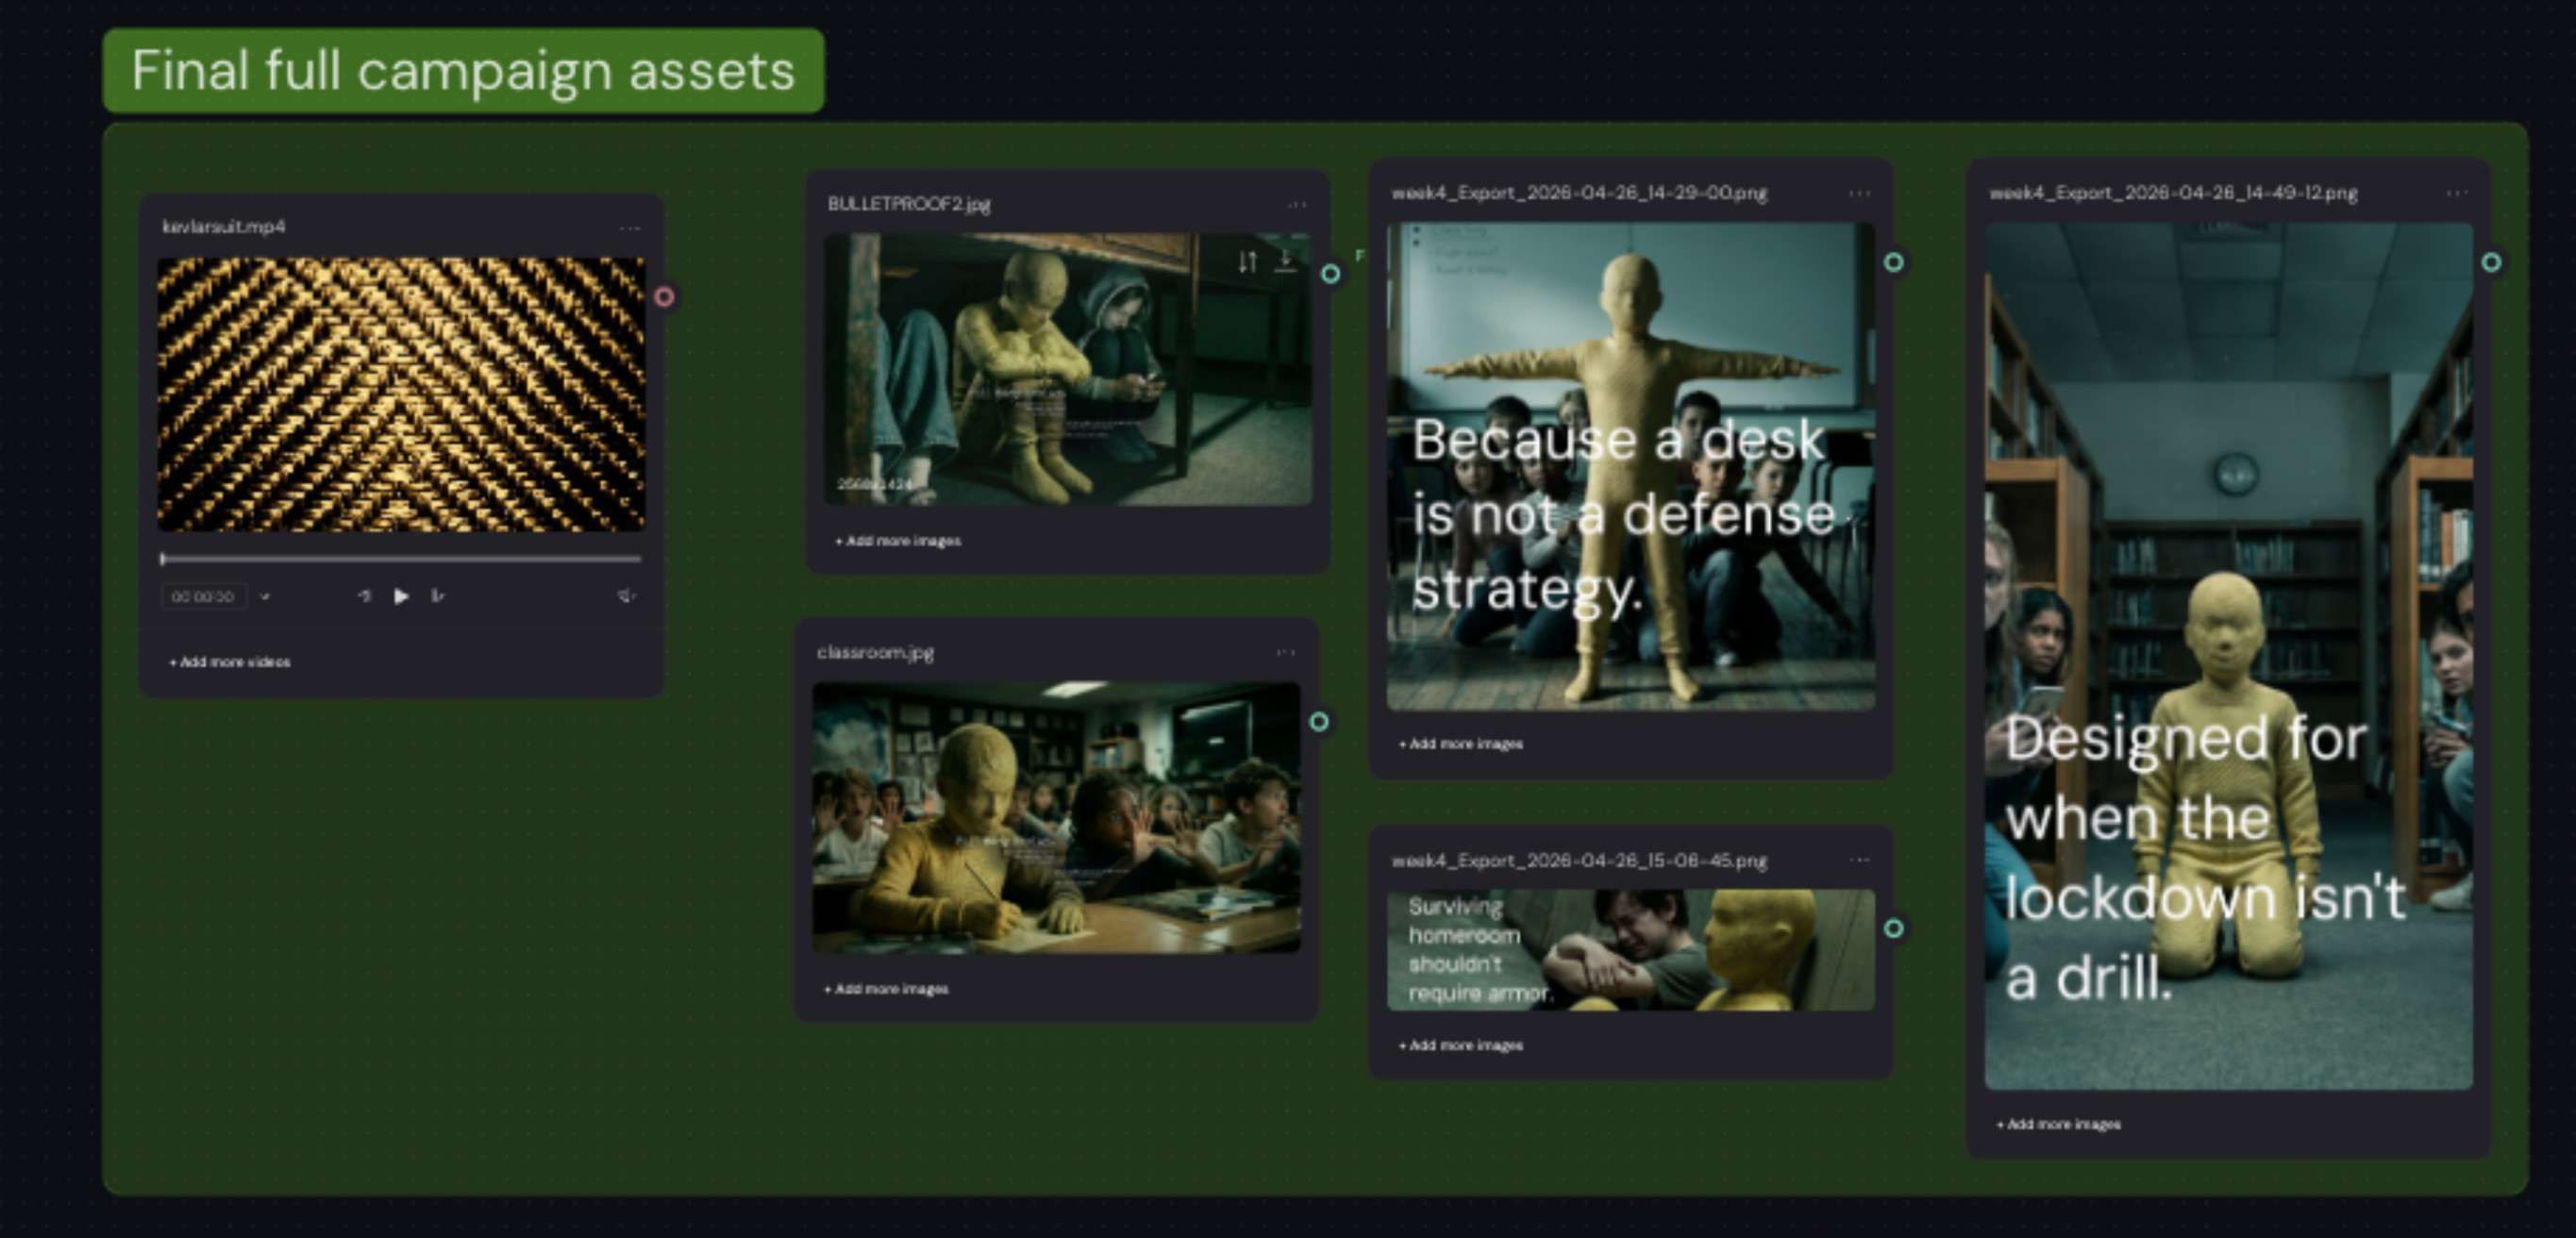 Final campaign assets. Film, key visuals, and headline variations sitting together at the end of the graph.
What I Kept for Myself
I do not ideate with these models.
The moment the idea arrives is the part of this job I actually love. It is the thing that makes me sit up. I have tried handing that moment to a model and it has never once come back with something whole. What it comes back with is close enough to be distracting and wrong enough to cost me the afternoon.
So the idea is mine. The music selection is mine. The voice direction is mine. The edit is mine.
ElevenLabs generated the voice and Suno generated the track. Which voice and which track was never going to be something I handed off.
What I gave the machine was the execution. Every angle, every resize, every variation. That is the work I was happy to automate, and automating it is what gave me the room to keep the rest.
What Was Hard
Honestly, the tool.
Not the concept and not the craft. The nodes. The names. What connects to what and why. Node based workflows are overwhelming when you first open one, and I think that is the real barrier for most creatives, not the AI part. Once it clicked, though, it became the fastest AI filmmaking workflow I've used.
What got me through it was unglamorous. I rewatched Raoni’s class more times than I want to admit. I asked too many questions. I watched every video Weavy has put out, not just the official channel but podcast appearances where people walked through their own builds. Then I took those workflows apart and rebuilt them until they made sense.
I am still learning. There are people using this platform who are absolute beasts.
What You Can Take From This
Consistency is architecture, not prompting. Build the character sheet first.
When a prompt will not obey, stop writing and start masking or critical thinking.
Let the LLM write the prompts. Your job is the instruction above them. READ the outputs ALWAYS.
Reference images carry a look more reliably than any description of it.
Automate the execution. Keep the idea. That is the shape of a repeatable AI advertising workflow.
Learn with Lighthouse: Build Workflows That Enhance Creativity
At Lighthouse AI Academy, we believe that the most valuable AI projects are not defined by the tools they use, but by the systems they create.
Carlos's workflow shows how combining storytelling with AI inside Figma Weave can create faster, more flexible creative systems.
The goal is not to remove the creative from the process.
The goal is to give creatives better tools, stronger systems, and more time to focus on creative decisions that matter.
Because when AI is implemented thoughtfully, it does not replace creativity.
It expands it.
That’s why we teach our students about:
USING AI TO ENHANCE, NOT REPLACE.
View our courses now and build your own systems with purpose.